
BLEASS Megalit packs the stunning depth, power and sound quality of modern plugin synthesizers into an instrument that’s as satisfying to play as it is easy to program.
With its blend of wavetable and classic subtractive oscillators, flexible filtering and post-processing, and an extensive set of advanced modulation sources, BLEASS Megalit provides sound designers with a vast palette of timbral tints, shades and colours to explore. And, thanks to BLEASS’ super-intuitive interface design, that entire sonic palette is within easy reach of even the most non-technical of musicians.
Megalit includes many innovations that will empower your sound designs:
- Advanced wavetable oscillators can adjust both wavetable position and fold, bringing near-infinite variety to each of the synth’s 135 wavetables;
- Per-oscillator unison mode allows you to create complex layering that would normally require you to load additional synths into your project;
- Noise generator with dedicated high- and low-pass filtering for super-flexible non-tonal sounds and sound components.
- Resonant high-pass and low-pass filters that can be applied to individual oscillators or pairs of oscillators, as can the built-in waveshaper and bit-crusher processors;
- Four LFOs, each with its own timing curve and output smoothing, that allow for the creation of exceptionally complex – not to mention original – modulation patterns;
- Advanced Motion Sequencer for the creation of complex repeating modulation patterns;
- Per-patch storage of performance controller response curves ensure a sound will always respond the way you expect it to;
- Patch randomising feature always produces useable sounds;
- Built-in multi-band upward/downward compressor provides exquisite control over a sound’s dynamics and punchiness.
All of Megalit’s parameters, settings and controls, no matter how advanced, are laid out at your fingertips, with intuitive visual feedback ensuring you always know exactly what the synth is doing. And, despite its huge sonic power, Megalit is super-efficient on your system, leaving you with plenty of headroom for running additional instruments and effects… or, better still, more instances of Megalit!

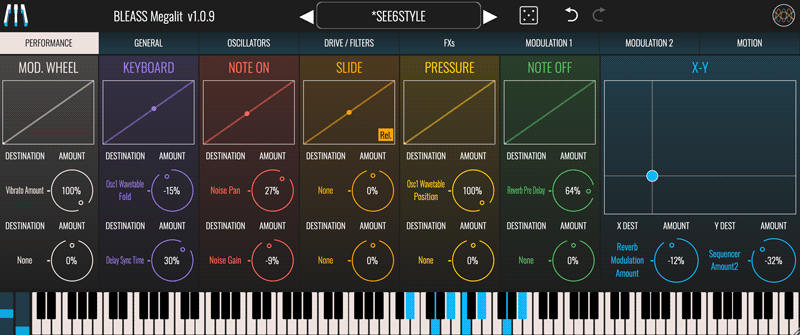
PERFORMANCE TAB
The Performance tab is where incoming realtime performance control messages are routed to Megalit’s parameters. For example:
- mapping Pressure to filter cutoff will cause the filter to open and close based on the pressure you apply to the key on your controller;
- mapping Note On to Reverb Mix will cause the amount of reverb that is heard to change based on how hard the note is played;
- mapping Keyboard to Filter Envelope attack will cause the filter to respond differently based on the pitch of the notes you play.
PERFORMANCE CONTROL TYPES
Mod. Wheel: Receives the controller messages from your keyboard’s (or other performance device’s) modulation wheel. Responds to CC-1.
Keyboard: (aka “keyboard tracking”, “keyboard follow”) The value of this controller message changes depending on the pitch and position of the note you play. Lower notes produce lower values; higher notes produce higher values.
Note On: (aka “note-on velocity”, “velocity”, “strike”) The value of this controller message is determined by how hard you strike a key on your keyboard (or other performance device). Firmer strikes produce higher values.
Slide: Responds to note-specific CC-74 messages received from MPE-compatible controllers. Slide’s behaviour can be switched between relative and absolute modes.
Pressure: (aka “aftertouch” or “channel pressure”) The value of this control message is determined by the amount of pressure being applied to a key or pad whilst it is held down. When playing polyphonically, such that different fingers may be applying different pressures, only the highest pressure value will be received.
Note Off: (aka “note-off velocity”, “lift”) Although rarely utilised, most keyboard controllers measure how quickly you fully remove your finger from a key. The faster you release a key, the higher the note-off velocity value will be. You can think of this as the opposite of note-on velocity.
X-Y: Receives the dual messages from an X-Y touchpad or joystick controller. X responds to CC-113; Y responds to CC-114.
VISUALISATIONS AND ROUTING
Graphs / Sensitivity Curves: Each performance control type has a panel that visualises its most recent value, in realtime, as a marker on a graph. With the exception of X-Y, dragging a graph adjusts the response curve for the associated performance control. The X-Y graph doubles as a handy on-screen X-Y pad for generating X-Y control messages. The curves / X-Y position are stored when you save a patch.
Destination: Each incoming performance controller can be routed to two synth parameters. In the case of X-Y, the X and Y components can each be routed to a single synth parameter.
Click / tap beneath a “Destination” label to open a menu from where you can select the parameter that will receive the performance control messages.
Amount: Controls how strongly the destination parameter will be affected by a performance control message. Positive settings will cause the destination parameter to be increased in response to an increasing performance control value; negative settings will cause the destination parameter to be decreased in response to an increasing performance control value.

GENERAL
Set up the general parameters of the Synth such as Output, Polyphony, Glide, Unison…
OUTPUT
Meters: Indicates Megalit’s current output level
Volume: Controls Megalit’s master output level
VOICES
Poly: Enables or disables Megalit’s polyphonic mode.
Retrigger: Enables or disables the retriggering of ADSR envelopes when playing legato. Has no effect when Poly is enabled.
Vibrato: Sets the rate, in milliseconds, of global pitch vibrato
Amount: Sets the strength of global pitch vibrato. A setting of 100% means the pitch will oscillate between -1 semitone and +1 semitone.
Pitch Bend: Determines the maximum pitch bend range, in semitones.
Glide: Sets the time taken for the synth’s pitch to ramp from the previously-played note to the currently-played note.
UNISON
Megalit includes a Unison effect that creates up to seven duplicates of an oscillator’s voice. This can create a thicker, fuller sound.
Target: Enables or disables the Unison effect for each oscillator.
Voices: Sets the number of voice duplicates to create, up to a maximum of 7.
Detune: Sets the amount of detuning to apply to the unison voices. The detuning is spread amongst the voices, with a setting of 100% meaning that the most-detuned voice(s) will be 1 semitone above and/or below the played note.
Stereo: Sets the amount of stereo spread to apply to the unison voices.
FM
Megalit’s FM feature provides a dedicated oscillator that can be used to rapidly modulate the pitch of the main oscillators. These pitch modulations give rise to harmonics within the main oscillator’s output that can radically change the timbre and character of the sound.
Target: Determines the oscillators that will be modulated by the FM oscillator.
Wave: Sets the waveform of the FM oscillator. Different waveforms create different patterns of harmonics within the targeted oscillators.
Coarse: The frequency of the FM oscillator is always related to the note being played. The Coarse value acts as a multiplier that is applied to the frequency of the played note.
For example, a middle A note has a frequency of 440Hz. If you play this note with the FM Coarse value set to “1”, the FM oscillator’s frequency will also be 440Hz. If you then increase the Coarse value to “2”, the FM oscillator’s frequency will be 880Hz. A setting of “0.5” will create an FM frequency of 220Hz. And so-on.
Amount: Determines the amplitude of the FM oscillator signal. Higher values lead to a greater impact on the targeted oscillators.
ARPEGGIATOR
State: Enables or disables the arpeggiator
Mode: Sets the sync mode of the arpeggiator.
FREE uses an internal timer that is set within the instrument.
SYNC synchronises the arpeggiator to the host DAW’s beat.
BEAT synchronises the arpeggiator to the host DAWs beat and synchronises the arpeggiator’s pattern position to the host’s bar-and-beat position.
Rate: Sets the speed of the arpeggiator. The value you enter represents the time between each note that the arpeggiator produces.
In FREE mode, the rate is set in milliseconds
In SYNC and BEAT modes, the rate is set as a note length.
Mode: Determines the pattern of notes that the arpeggiator will produce.
NORMAL: Notes are played in the order in which they were triggered.
UP: Notes are played in pitch order, from lowest to highest.
DOWN: Notes are played in pitch order, from highest to lowest.
UP/DOWN: Notes are played in pitch order from lowest to highest, and then back to lowest.
RANDOM: Notes are played in a random order
Octave: Sets the number of additional octaves that the arpeggiator should cover. When set to “0”, only the triggered notes will be played. When set to “1”, notes that are one octave higher than the triggered notes are added to the arpeggio; higher settings add additional octaves.
Gate: Sets the length of the arpeggiator’s notes, as a proportion of the Rate setting.
Repeat: Sets the number of times each note is repeated before the arpeggiator moves on to the next note.
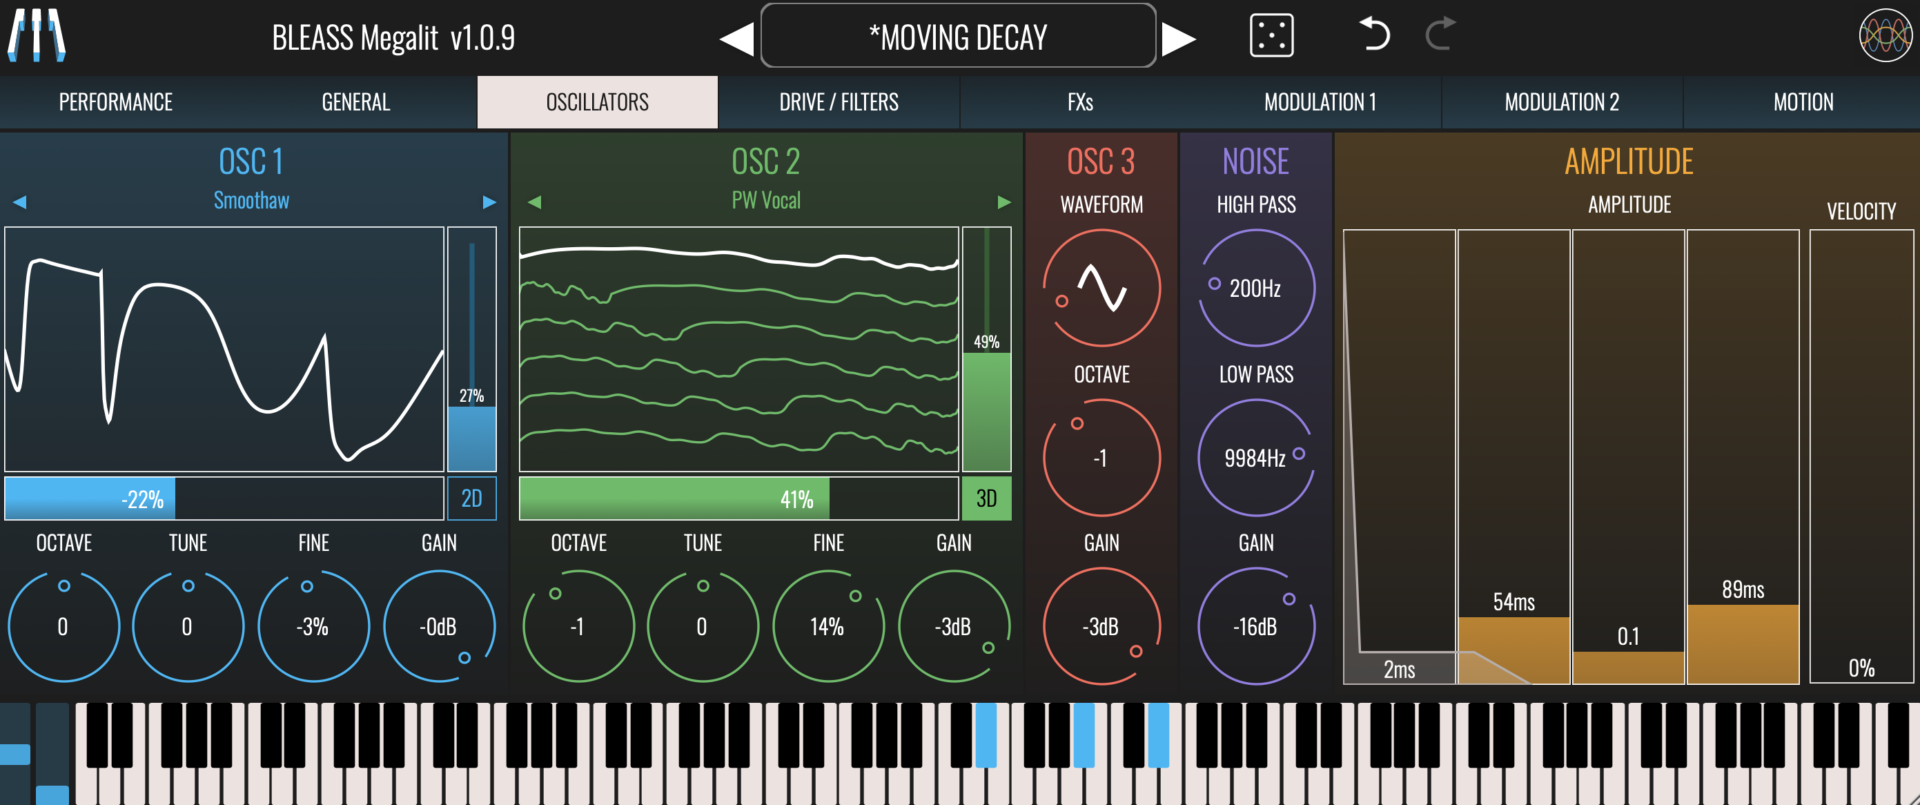
OSCILLATORS
BLEASS Megalit offers extensive possibilities of sound design with its over 130+ Foldable Wavetables and 3rd Oscillator.
OSC 1 & OSC 2
Megalit’s first pair of oscillators are advanced wavetable oscillators. A wavetable can be thought of as a collection of waveforms that morph smoothly between starting and ending waveforms.
Wavetable Selector: Selects the wavetable to load into the oscillator. Use the left and right arrows to step through the available wavetables, or click the wavetable name to open a categorised menu of all included wavetables.
(you can import your own custom wavetables: read the tutorial here.)
Visualisation: When operating in 3D mode, the visualisation shows a representation of the currently loaded wavetable. The waveform that results from the current oscillator settings is represented by the white overlay.
When operating in 2D mode, the visualisation provides a detailed representation of the current waveform only.
Wavetable Position: Control the wavetable position using the vertical fader that sits to the right of the visualisation. The fader indicates the current wavetable position. Any modulation being applied to Position is shown as a central overlay within the fader.
Wavetable Fold: Fold provides an alternative way to modify the shape of the wavetable’s waveforms. It does this by compressing the wavelength of the shaped part of the waveform without changing the overall wavelength. Conceptually, this is similar to adjusting the pulse width of a pulse wave.
Control the wavetable fold using the horizontal fader that sits beneath the visualisation. Any modulation being applied to Fold is shown as a central overlay within the fader.
Octave: Determines the octave offset of the oscillator.
Tune: Sets the coarse tuning of the oscillator, in semitones.
Fine: Adjusts the oscillator’s fine tuning. The value shown is a percentage of a semitone.
Gain: Sets the output level of the oscillator.
OSC 3
Megalit’s third oscillator is dedicated to producing standard subtractive waveforms.
Waveform: Selects the waveform that the oscillator will produce. Drag the waveform representation to have it morph smoothly from sine wave, through triangle and sawtooth waves, to square and pulse waves.
Octave: Determines the octave offset of the oscillator.
Gain: Sets the output volume level of the oscillator.
NOISE
Megalit’s noise generator produces a white noise signal that can be filtered to change its intensity and character.
High Pass: Sets the noise generator’s high-pass filter cutoff frequency. Frequencies that lie below the cutoff frequency are attenuated.
Low Pass: Sets the noise generator’s low-pass filter cutoff frequency. Frequencies that lie above the cutoff frequency are attenuated.
Gain: Sets the output volume for the noise generator.
AMPLITUDE
Megalit’s amplitude envelope affects all oscillators and the noise generator equally.
ADSR Faders: The envelope faders allow you to set the envelope’s attack time, decay time, sustain level and release time (respectively) in a visually intuitive manner. The resulting envelope shape is shown overlaying the faders. Any modulation applied to any of the ADSR faders is shown as a central bar within the fader.
Velocity: Determines how strongly note-on velocity (aka “velocity”, “strike”) impacts the amplitude of the envelope, and therefore the loudness of the sound that’s produced.

DRIVE / FILTERS TAB
Fully control the grittiness of the Synth’s sound thanks to the different Algorithms, Waveshaping, Bit Crusher & Filters
GENERAL
Algorithm: Selects the routing algorithm used by Megalit’s drive and filter post-processing modules. From top to bottom, the three options are:
- Mixed: Applies post-processing to the mixed output of the oscillator section (Osc 1 + Osc 2 + Osc 3 + Noise).
- Paired: Applies post-processing to submixed pairs of oscillators (Osc 1 + Osc 2 and Osc 3 + Noise).
- Single: Applies post-processing to the individual oscillator and noise generator outputs.
WAVESHAPER
State: Enables or disables the Waveshaper processor. The available options depend upon the current post-processing Algorithm.
Waveshaper Algorithm: Selects which of the six shaping algorithms to use. Different algorithms produce very different sonic results. The chosen shape is illustrated in the visualisation.
Drive: Sets the input gain of the Waveshaper processor. Higher values result in a more saturated / distorted sound.
Strength: Controls the intensity of the waveshaping process. Changes in this value are reflected in the waveshaper visualisation.
Blend: Controls the wet/dry balance of the Waveshaper processor. At 0% only the dry input signal is heard; at 100% only the waveshaped signal is heard.
CRUSHER
The Crusher processor creates digital-style distortion by emulating reduced bit depths and/or sample rates.
State: Enables or disables the Crusher processor. The available options depend upon the current post-processing Algorithm.
Depth: Modifies the apparent bit depth of the sound. Lower values result in harsher, glitchier sounds.
Rate: Modifies the apparent sample rate of the sound. Affects the clarity and timbre of the sound whilst introducing an increasing amount of aliasing.
HIGH PASS & LOW PASS
Megalit features both high-pass and low-pass filters for shaping and sculpting the timbre of a sound.
State: Enables or disables the filter. The available options depend upon the current post-processing algorithm.
Keyboard: Modifies the filter’s cutoff frequency based on the note that is played. Positive values cause the filter cutoff to rise as you play further up the keyboard; negative values cause the filter cutoff to reduce as you play further up the keyboard. The change in cutoff frequency is shown on the filter graph.
Envelope: Sets the strength and polarity of the Filters Envelope’s impact on the cutoff frequency. The change in cutoff frequency is shown on the filter graph.
FILTER GRAPH
The Filter Graph visualises the activity of both filters, and allows the cutoff frequency and resonance of the filters to be set. A handle is drawn in the graph for each enabled filter. Drag a handle left-to-right to modify the filter’s cutoff frequency (this is also shown as a value at the top of the graph). Drag the handle up-and-down to adjust the filter’s resonance.
FILTERS ENVELOPE
Megalit provides an envelope generator dedicated to modulating the filter’s cutoff frequency.
ADSR Faders: The envelope faders allow you to set the envelope’s attack time, decay time, sustain level and release time (respectively) in a visually intuitive manner. The resulting envelope shape is shown overlaying the faders. Any modulation applied to any of the ADSR faders is shown as a central bar within the fader.
Velocity: Determines how sensitive the Filters Envelope is to note-on velocity (aka “velocity”, “strike”). At low settings, note-on velocity has a small impact on the envelope’s magnitude/strength; at high settings, note-on velocity has a large impact on the envelope’s magnitude/strength.

FXs TAB
Control the Compressor, Delay & Reverb Effects
COMPRESSOR
State: Enables or disables the compressor
Low: Sets the split point frequency between low and mid compression bands.
High: Sets the split point frequency between mid and high compression bands.
Low / Mid / High Visualisation: The visualisation shows the activity of each of the compressor’s three bands. It also provides the means for setting the compression thresholds for each band.
Dragging a band’s lower threshold marker sets the upward compression threshold. Signals that fall below this threshold have their gain increased.
Dragging a band’s upper threshold marker sets the downward compression threshold. Signals that raise above this threshold have their gain reduced.
Low / Mid / High Gain: Each compressor band has its own gain control, located below the band’s visualisation. Adjust these to compensate for any gain boost or reduction being applied by the compressor, or to make a band more or less prominent.
Attack: Sets the time taken to go from no compression to full compression once a threshold has been passed.
Release: Sets the time taken to go from full compression to no compression when the signal passes outside of a threshold.
Gain (All): Modifies the overall output level of the compressor.
DELAY
State: Enables or disables the delay effect.
Mode: Sets the delay’s synchronisation mode. In Free mode, delay time is set in milliseconds and seconds. In Sync mode the delay time is based on the host DAW’s tempo, with delay time set in terms of note length.
Time: Sets the delay time either in absolute milliseconds and seconds, or in note lengths relative to the host DAW’s tempo.
Ping-Pong: Enables or disables the delay’s ping-pong mode. When enabled, delay repeats alternate between the processor’s left and right channels. Note that the width of the ping-pong effect that you hear is determined by the Delay’s Stereo setting.
Stereo: Works in conjunction with the Ping-Pong mode to set the stereo width of the alternating repeats. At ±100%, repeats are panned hard left and right; at 0%, repeats are all panned centrally. Only available when Ping-Pong mode is active.
Low Pass & High Pass: Sets the low- and high-pass filter cutoffs for the delay repeats.
Feedback: Determines how much of the delayed signal should be fed back to the processor’s input. Higher values lead to more repeats.
Mix: Sets the wet/dry balance of the delay processor. At 0% only the dry input signal is heard; at 100% only the delayed signal is heard.
REVERB
State: Enables or disables the reverb effect.
Room Size: Determines the reflective character of the reverb effect.
Length: Sets the overall decay time of the reverb.
Low Cut: Sets the point below which the prominence of low frequencies within the reverb sound will be reduced.
Pre Delay: Introduces a short delay between the source sound and the onset of the resulting reverb.
Mod. Rate: Sets the speed at which the pitch of the reverb reflections are modulated. This can be used to thicken the reverb sound, or to create special effects.
Mod. Amount: Sets the strength of the reverb pitch modulation.
Color: Sets the point above which the prominence of high frequencies within the reverb sound will be reduced. The higher the setting the brighter the resulting reverb sound will be.
Mix: Sets the wet/dry balance of the reverb processor. At 0% only the dry input signal is heard; at 100% only the reverb signal is heard.

MODULATION TABS
Megalit provides four advanced LFOs (Low Frequency Oscillators) that can be used to create repeating modulations in many of Megalit’s parameters.
LFO 1, LFO 2, LFO 3, LFO 4
Shape: Sets the shape of the LFO waveform. Choose from sine, triangle, sawtooth up, sawtooth down, square and sample-and-hold.
Sync Mode: Choose the LFO’s synchronisation mode.
FREE uses internal timing for the LFO.
SYNC synchronises the LFO to the host DAW’s tempo.
BEAT synchronises the LFO to the host DAW’s tempo and bar position.
Rate: Sets the time taken for the LFO to complete one cycle of its waveform. The Rate is expressed as milliseconds and seconds when in FREE sync mode, otherwise it is expressed in terms of note length.
Retrigger: When enabled, causes the LFO to restart its cycle when a note is played.
No Triplets: When enabled, any triplet value selected for the LFO Rate (1/3, 1/6 etc.) will be ignored. Not available in FREE sync mode.
Time Shape: The Time Shape graph alters the rate at which the LFO moves through its waveform cycle. When the graph shows a straight line no time shaping will be applied. Dragging the line introduces a curve that illustrates how the LFO’s timing will change through each cycle of the waveform. Double click / double tap the graph to reset the time shape. The results of the Time Shape are clearly visible in the LFO’s visualisation.
Offset: Offsets the start point of the LFO’s cycle, in effect shifting the LFO’s phase with respect to the trigger note and/or the DAW’s tempo.
Smooth: The Smooth parameter imposes a maximum rate of change on the LFO’s output values. This means that, for example, when a saw tooth LFO wave reaches the end of a cycle the LFO value ramps down to the minimum rather than immediately dropping to the minimum, thereby smoothing-out the sudden value change. This can also have the result of damping the magnitude of the LFO. The results of smoothing are clearly visible in the LFO’s visualisation.
Destination (x2): Specifies a target parameter that will be modulated by the LFO.
Amount (x2): Scales the strength of the LFO’s impact on the corresponding destination parameter. Negative values will reverse the polarity of the modulation – in other words, when the LFO is rising the destination parameter’s value will be reduced.
ENVELOPE GENERATOR 1, ENVELOPE GENERATOR 2
Megalit’s pair of additional envelope generators can be used to modulate parameters over time, from note on to note off.
ADSR Faders: The envelope faders allow you to set the envelope’s attack time, decay time, sustain level and release time (respectively) in a visually intuitive manner. The resulting envelope shape is shown overlaying the faders. Any modulation applied to any of the ADSR faders is shown as a central bar within the fader.
Velocity: Determines how sensitive the Envelope Generator’s is to note-on velocity (aka “velocity”, “strike”). At low settings, note-on velocity has a small impact on the envelope’s magnitude/strength; at high settings, note-on velocity has a large impact on the envelope’s magnitude/strength.
Destination (x2): Specifies a target parameter that will be modulated by the Envelope Generator.
Amount (x2): Scales the strength of the Envelope Generator’s impact on the destination parameter. Negative values will reverse the polarity of the modulation – in other words, when the envelope’s value is rising the destination parameter’s value will be reduced.

MOTION SEQUENCER TAB
Megalit’s Motion Sequencer allows patterns of values to be sequenced that can then be used to modulate up to two other parameters.
MOTION SEQ. PARAMETERS
State: Enables or disables the Motion Sequencer
Mode: Choose the Motion Sequencer’s synchronisation mode.
- SYNC synchronises the Motion Sequencer to the host DAW’s tempo. The DAW does not need to be playing.
- BEAT synchronises the Motion Sequencer to the host DAW’s tempo and bar position.
- NOTE JUMP the Motion Sequencer steps to its next position each time a note is played.
- NOTE RESET synchronises the Motion Sequencer to the host DAW’s tempo, with the sequence restarting each time a note is played.
- ARP RESET synchronises the Motion Sequencer to the host DAW’s tempo. If the Arpeggiator is enabled the sequence will restart each time a chord is played.
Resolution: Sets the rate at which the Motion Sequencer plays with respect to the host DAW’s tempo.
Loop: Only operates when in NOTE RESET mode. If enabled, the Motion Sequencer will continue to loop through its sequence after a note has been played; if disabled, the Motion Sequencer will stop playing when it reaches the end of the sequence.
Grid: When Snap ON is selected, values you set in the Motion Sequencer will snap to the vertical grid. When Snap OFF is selected, any value can be set within the sequence.
Click the RESET button to restore the sequencer to its default state.
Sequencer Grid: Click/touch on the sequencer grid to set a value for the corresponding sequencer step. You can also right-click on the grid to open a popup where you can type in a value for the step (1 = maximum; 0.5 = middle; 0 = minimum).
Step Shape Buttons: The buttons below each step control the step shape. Clicking the button will cycle through the available step types; alternatively, right clicking on a button opens a popup in which you can enter the number that corresponds with the desired step type:
- 0 – STEP: Outputs a constant value for the duration of the step.
- 1 – RAMP: The step’s value will change from its initial value to its ending value over the duration of the step. The ending value is determined by the subsequent step.
- 2 – UP: The step’s value will change from an initial value that you set to the maximum value over the duration of the step.
- 3 – DOWN: The step’s value will change from the minimum value to an ending value that you set, over the duration of the step.
- 4 – SMOOTH RAMP: Similar to RAMP, but with smoothing of the value transitions between steps.
Length: Specifies the number of steps within the sequence.
Randomness: Introduces a random element to the value of the current step. The higher the Randomness setting, the larger the possible deviation from the step’s programmed value.
Destination (x2): Specifies a target parameter that will be modulated by the Motion Sequencer.
Amount (x2): Scales the strength of the Motion Sequencer’s impact on the corresponding destination parameter. Negative values will reverse the polarity of the modulation.

-
Sale!
 -37%
-37%BLEASS Megalit Bundle
Original price was: 156.00$.99.00$Current price is: 99.00$. ADD TO CART -
Sale!
 -24%
-24%Pulse Preset Packs Bundle
Original price was: 25.00$.19.00$Current price is: 19.00$. Add to cart -
Sale!
 -9%
-9%Sonic Forge Preset Packs Bundle
Original price was: 32.00$.29.00$Current price is: 29.00$. Add to cart
Also available for iOS
![]()
TUTORIALS & REVIEWS:


