Born of the imagination of legendary keyboardist Jordan Rudess and the software engineering excellence of French audio developer BLEASS, SampleWiz 2 is a unique and powerful S&S (sample & synthesis) instrument. BLEASS SampleWiz 2 combines modern features such as granular and cloud sample engines, MPE, and iOS/desktop interoperability, with the satisfying, rapid workflow of classic hardware samplers.
Over a career spanning more than 40 years (and counting), Jordan Rudess has built a formidable reputation. His exquisite skills as a keyboardist have graced the recordings and tours of Dream Theater, David Bowie, Liquid Tension Experiment and Rod Morgenstein to name but a few. Jordan is also recognised as something of a savant in the world of sound design, and has collaborated over many years with synth manufacturers such as Korg, Moog and IK Multimedia. And as if that weren’t enough feathers for one cap, Jordan is a pioneer in the use of iOS in music creation and performance, and has worked on numerous groundbreaking music apps over the last decade, for example Geoshred and Morphwiz.
![]()
With SampleWiz 2, BLEASS has distilled the phenomenal breadth and depth of Jordan’s expertise and experience into an intuitive synthesizer that will unleash your sonic imagination, inspiring both your musical and sound design creativity.
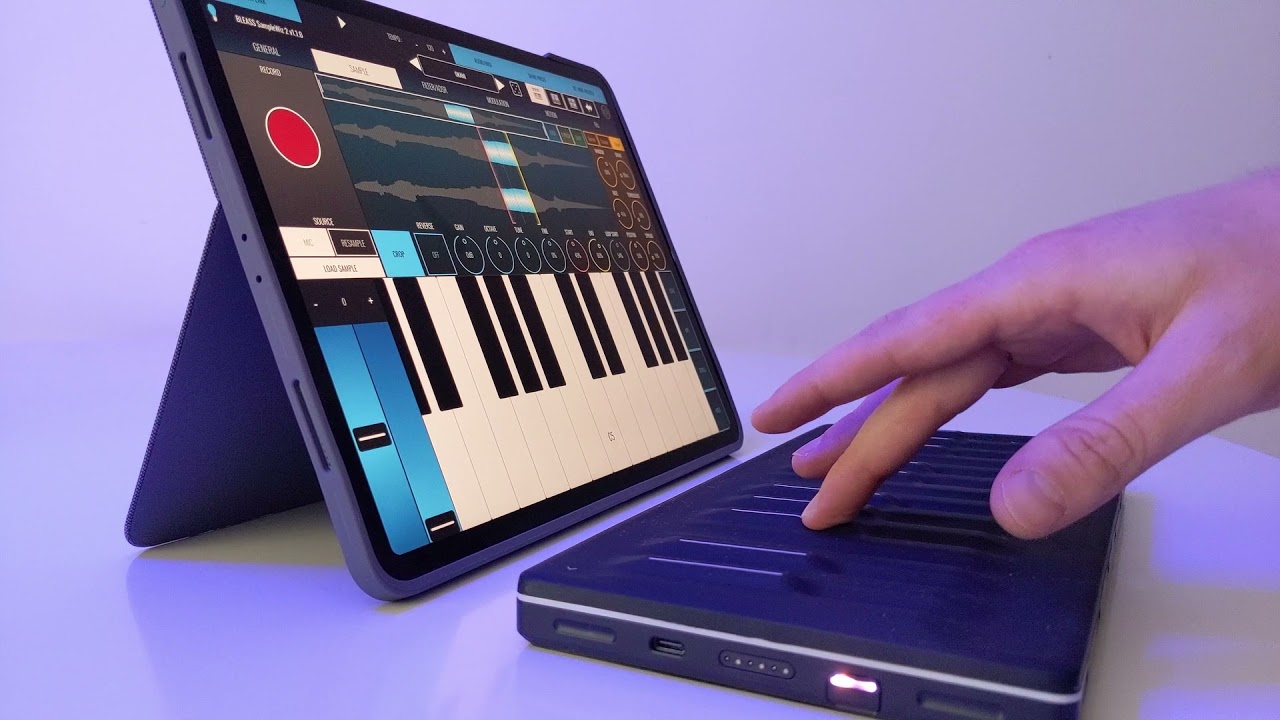
With just a few swipes of your finger, or a couple of clicks of your mouse, you can easily capture any sound or import any sample – a few more swipes/clicks will transform your sound into a playable, characterful synth voice. And with full support for MPE Slide and Pressure, SampleWiz 2 allows you to create nuanced and deeply expressive performances.
![]()
With its unique iOS / desktop interoperability, BLEASS SampleWiz 2 fits in with your way of creating and performing too. You can capture and work on sounds whilst out-and-about using the iOS app or AUv3 plugin, then transfer your creation to your computer via AirPlay or iCloud where you can incorporate it into a bigger project. Conversely, you can take a favourite sound from your Windows or Mac computer and transfer it to your iPad or iPhone ready for use in a live performance, where you to take full advantage of the iOS version’s intuitive touch screen performance controls.
Creating original sounds with BLEASS SampleWiz 2 is as easy and fun as it is to load and play presets. The UI has been carefully designed to give a natural, intuitive workflow, with delightfully simple sampling or import of sounds, and a comprehensive suite of tools for chopping, granularizing, modulating, and adding effects to your sound designs. These are distributed across six tabs:
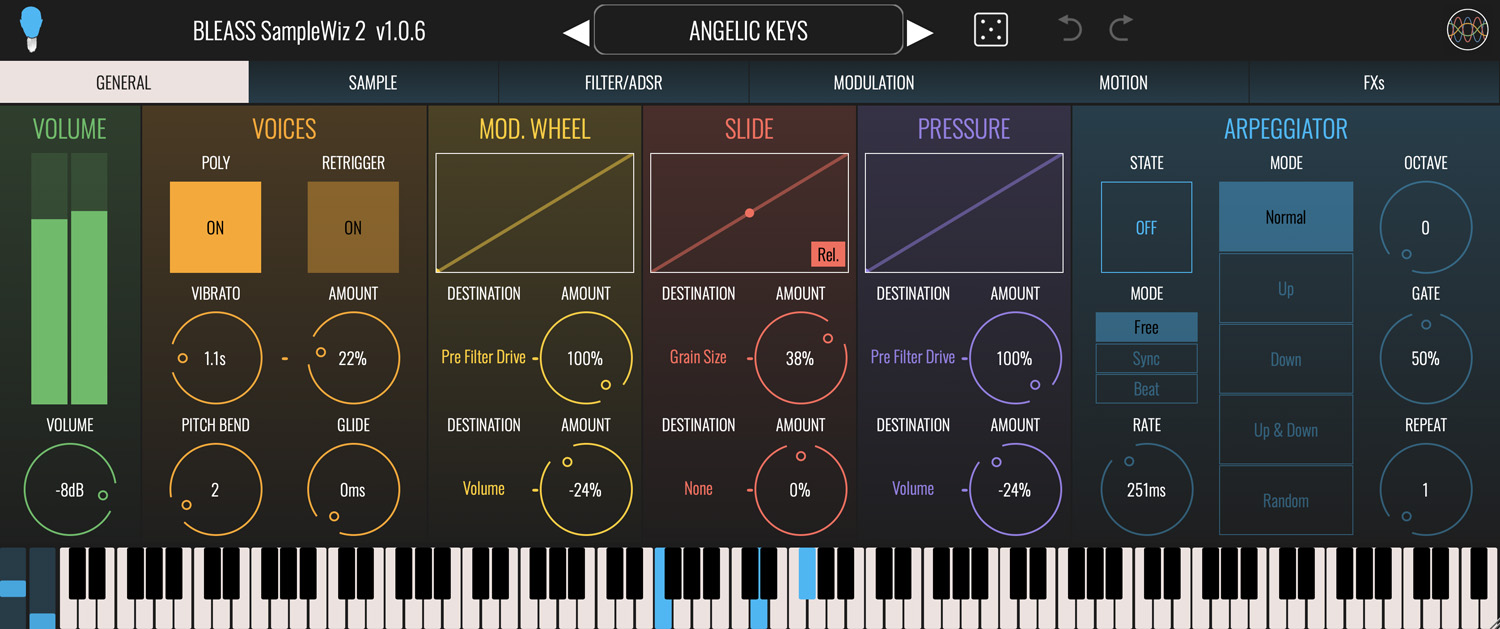
GENERAL TAB
Set the basic synth properties, such as voices, glide, MPE modulation targets, and arpeggiator.
VOLUME
Adjust the master volume and read current output level, including peaks.
VOICES
POLY: Switches between monophonic and polyphonic modes
RETRIG / RETRIGGER: When in monophonic mode, determines whether-or-not envelopes should be retriggered when playing legato notes. Has no effect when POLY is enabled.
PITCH BEND: Sets the global pitch bend range, in semitones.
VIB SPEED / VIBRATO: Sets the rate of the global pitch vibrato effect.
VIB AMOUNT / AMOUNT: Sets the intensity of the global vibrato effect. At 0% no pitch vibrato will be heard; at 100% the pitch will fluctuate by a semitone above and below the played note.
GLIDE: Sets the time taken for the synth’s pitch to move from the last played note to the currently played note.
MOD.WHEEL, SLIDE, PRESSURE
Incoming controller messages are all handled in a similar way. The Slide controller is MPE-only, so only relevant if you have a keyboard (or other performance controller) that supports the protocol. Pressure will respond to standard MIDI Aftertouch or to MPE Pressure messages, depending on the capabilities of the connected performance controller.
GRAPHS: The graphs show the value of any incoming Mod.Wheel, Slide or Pressure messages, as well as SampleWiz 2’s response curve for those messages. Touch/click and drag on a graph to change the response curve’s shape.
DESTINATIONS: Each incoming controller can be mapped to two destination parameters. Tap/click on the pop-up menu to choose a destination.
AMOUNT: Sets the strength of impact of the incoming controller message on the destination parameter.
ARPEGGIATOR
STATE: Enable or disable the arpeggiator
SYNC: Sets the sync mode of the arpeggiator:
FREE uses an internal timer that is set within the instrument.
SYNC synchronises the arpeggiator to the host DAW’s beat.
BEAT synchronises the arpeggiator to the host DAWs beat and synchronises the arpeggiator’s pattern position to the host’s bar-and-beat position.
RATE: Sets the speed of the arpeggiator. The value you enter represents the time between each note that the arpeggiator produces.
In FREE mode, the rate is set in milliseconds.
In SYNC and BEAT modes, the rate is set as a note length.
MODE: Determines the pattern of notes that the arpeggiator will produce.
NORMAL: Notes are played in the order in which they were triggered.
UP: Notes are played in pitch order, from lowest to highest.
DOWN: Notes are played in pitch order, from highest to lowest.
UP/DOWN: Notes are played in pitch order from lowest to highest, and then back to lowest.
RANDOM: Notes are played in a random order
OCTAVE: Sets the number of additional octaves that the arpeggiator should cover. When set to “0”, only the triggered notes will be played. When set to “1”, notes that are one octave higher than the triggered notes are added to the arpeggio; higher settings add additional octaves.
GATE: Sets the length of the arpeggiator’s notes, as a proportion of the Rate setting.
REPEAT: Sets the number of times each note is repeated before the arpeggiator moves on to the next note.
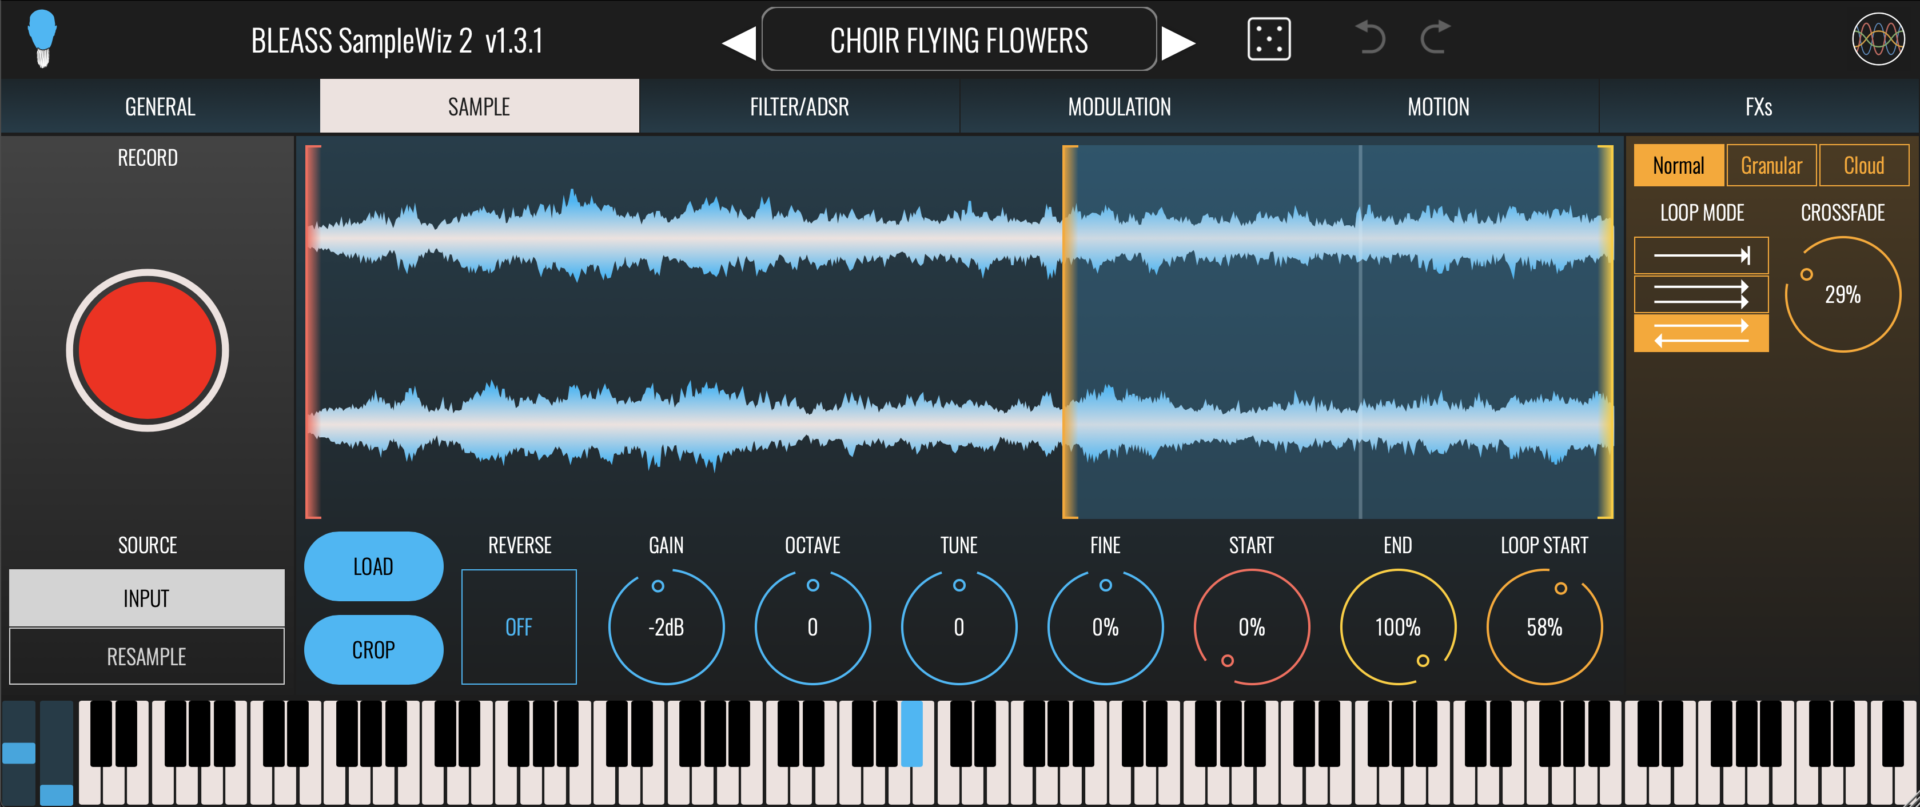
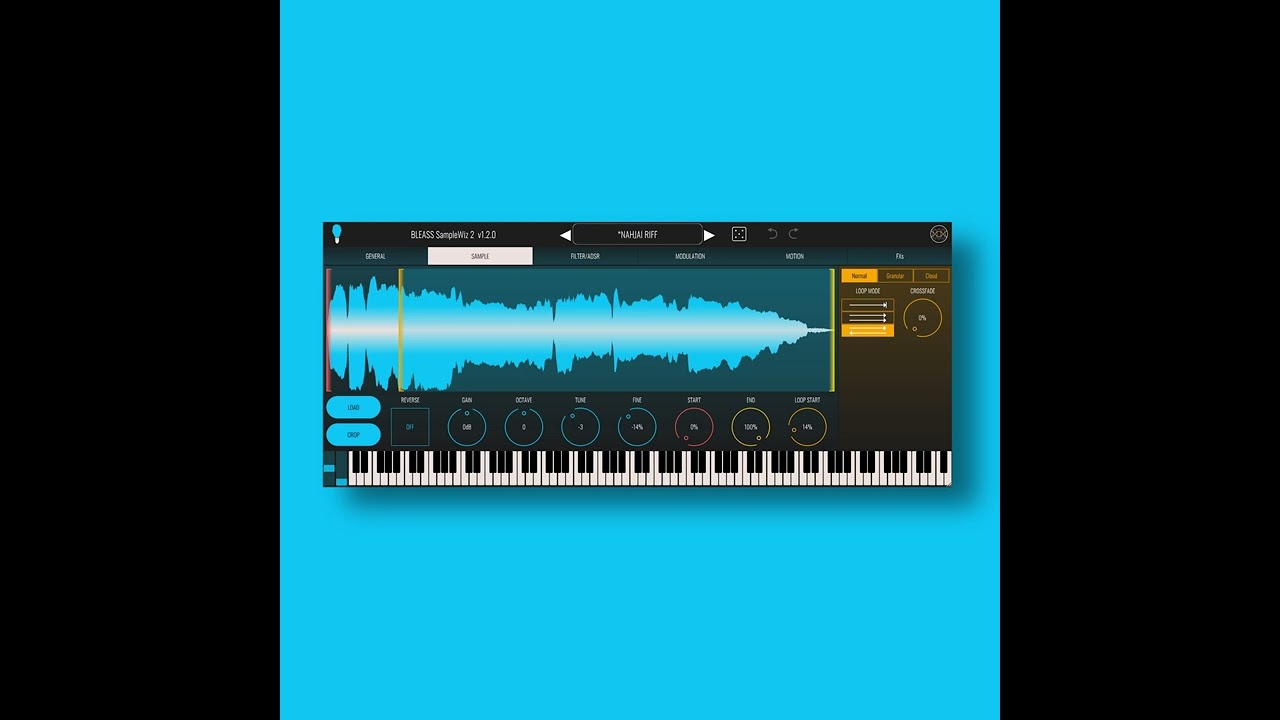
SAMPLE
Capture and edit samples and loop points, and configure the granular engine.
SAMPLE
RECORD (iOS + most Desktop DAWs): Instantly start recording a new sound. When running the standalone app, use the SOURCE options to choose whether to record from your device’s active mic, or from SampleWiz 2’s output (I.E. resampling). When running as an AUv3 FX plugin, SampleWiz 2 records audio from the track or buss it is assigned to. When used as a VST3, route the output signal from another track into SampleWiz 2 VST3.
LOAD SAMPLE / LOAD: Load an existing sample or audio recording from the file system.
On desktop, you can also drag & drop your audio file (under <1 minute / .wav or .aiff)
SAMPLE WAVEFORM: Tap/click and drag on the red marker to set the sample start position, and on the yellow marker to set the end point. Position the amber marker to set the loop start point.
iOS Only: Trigger and play the sample by tapping and dragging on the waveform view. Enable the Y PITCH button to control the pitch freely with the vertical position of your finger; also enable the SNAP button to have the pitch control lock to precise semitones.
CROP: Crops the sample to the current start and end points. Any audio that lies outside of those start and end points is discarded.
REVERSE: Reverses the direction of the sample.
GAIN: Adjusts the volume level of the sample
OCTAVE: Transposes the sample by octaves, with a range of +/- 2 octaves.
TUNE: Transposes the sample by semitones, with a range of +/- 12 semitones.
FINE: Transposes the sample by cents (I.E. 100th of a tone) with a range of +/- 50 cents.
START: Sets the sample start position.
END: Sets the sample end position.
LOOP START: Sets the sample’s loop start position.
LOOP MODE: Sets the sample’s loop mode.
- Play the sample once from start to end.
- Play the sample from start to end, then cycle continuously from loop start to sample end.
- Play the sample from start, then cycle back and forth between the sample end and loop start points.
NORMAL
Use this mode for standard sample playback.
CROSSFADE: Sets the length of crossfade applied during looping.
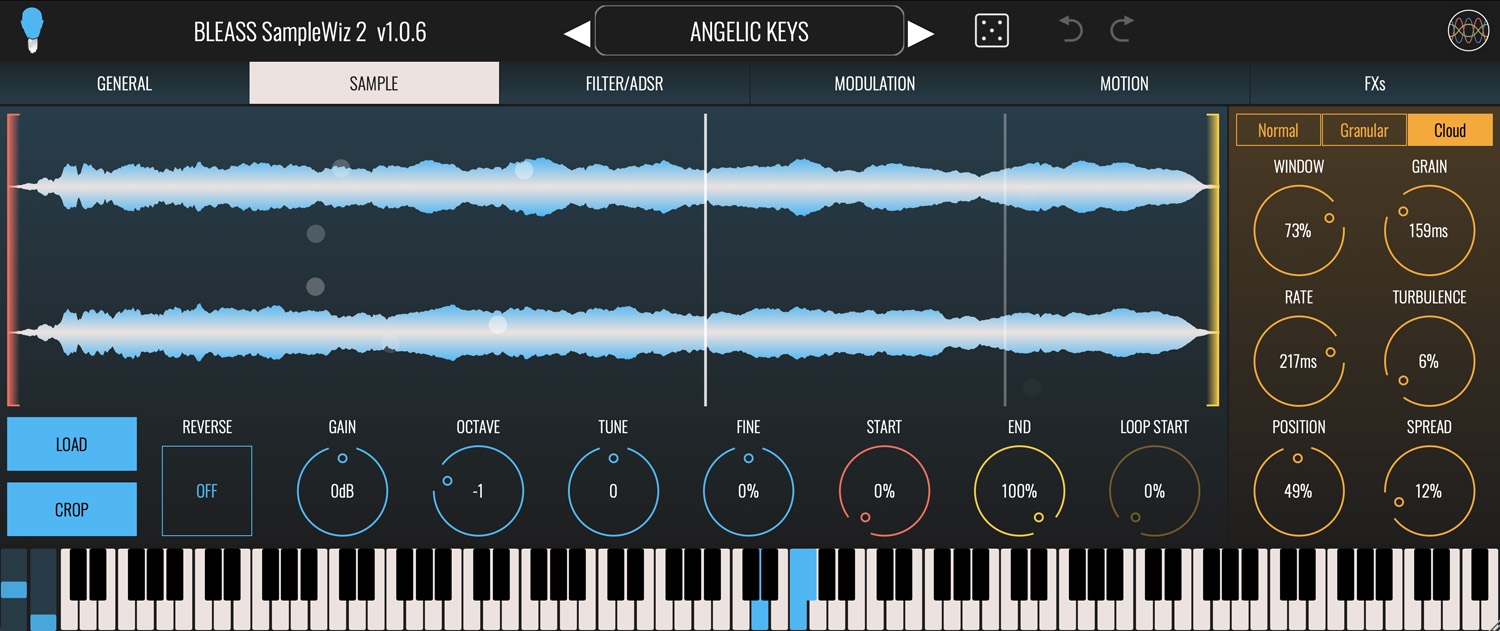
GRANULAR
Enables the Granular sampler engine. A “grain” is a small snippet taken from the source sample. Changing the grain sampling position changes the timbre that is produced, as does changing the size of the grains.
GRAIN: Sets the size/length of the grain.
SPEED: Sets the speed at which the grain sampling position moves through the sample. Use negative values to have the grain sampling position move in reverse, from sample end to sample start.
TURBULENCE: Adds a constantly changing random offset to the grain sampling position.
SPREAD: Controls how grain sampling is distributed across the left and right channels of the source sample. At 0% grains are taken from left and right channels evenly, resulting in a monaural sound. As the SPREAD is increased, grains are increasingly weighted towards left or right channels of the source sample. At 100% each grain will be taken from either the left or right channel of the source sample.
CLOUD
Enables the Cloud sampler engine. Like the Granular engine, the Cloud sampler engine takes small grains of audio from the source sample. Rather than stay static or simply move across the source sample, the Cloud engine oscillates the grain sampling position back-and-forth across a section of the source sample.
WINDOW: Sets the size of the grain sampling position’s oscillations as a percentage of the overall sample length.
GRAIN: Sets the size/length of the grain.
RATE: Sets the speed at which the grain sampling position will oscillate within the window.
TURBULENCE: Adds a constantly changing random offset to the grain sampling position.
POSITION: Sets the central location of the grain sampling position, as a percentage of the overall sample length.
SPREAD: Controls how grain sampling is distributed across the left and right channels of the source sample. At 0% grains are taken from left and right channels evenly, resulting in a monaural sound. As the SPREAD is increased, grains are increasingly weighted towards left or right channels of the source sample. At 100% each grain will be taken from either the left or right channel of the source sample.
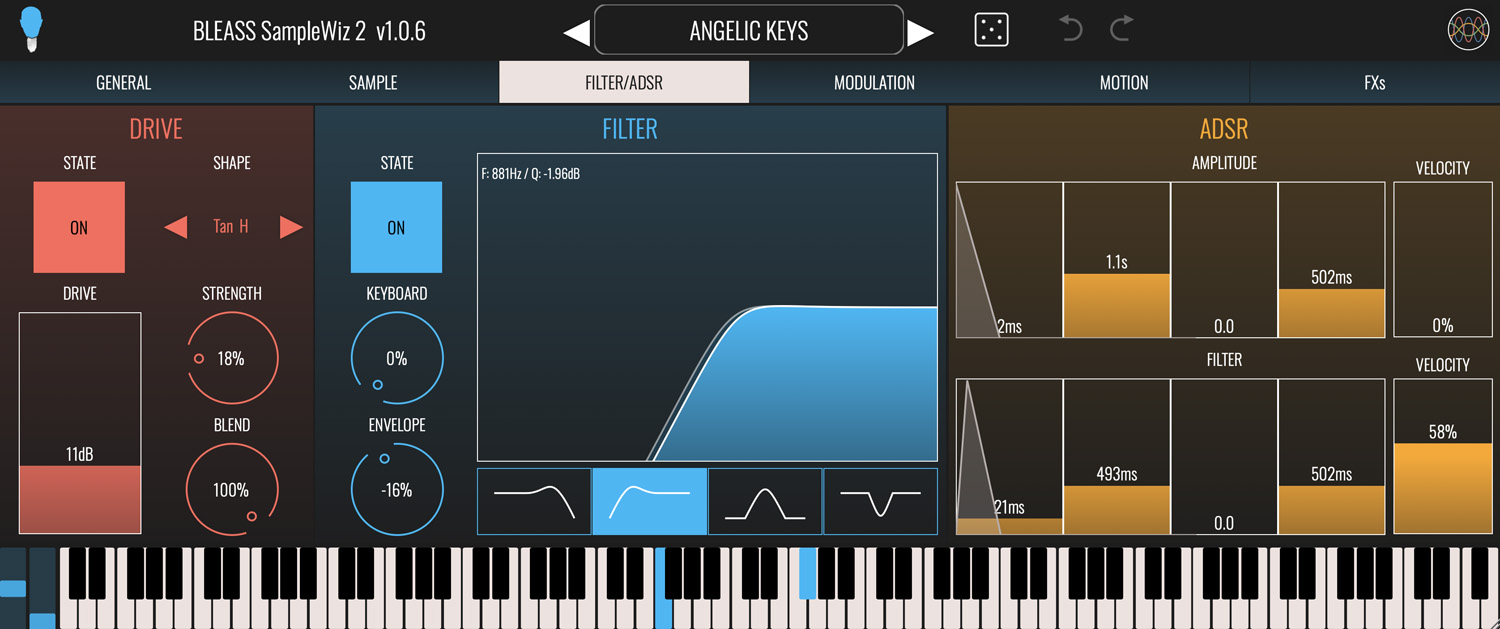
FILTER/ADSR
Configure SampleWiz 2’s overdrive processor and multi-mode filter, and set up ADSR envelopes for amp and filter cutoff.
DRIVE
SampleWiz 2’s pre-filter overdrive processor is great for adding grit, dirt and energy into a sound.
STATE: Enables or disables the overdrive processor
DRIVE: Sets the input gain of the overdrive processor.
SHAPE: Determines the clipping/waveshaping method used by the processor, which in turn affects the tone and character of the overdriven sound.
STRENGTH: Controls the strength of the Tan H waveshaping algorithm (only available when SHAPE is set to “Tan H”).
BLEND: Sets the wet/dry balance of the overdrive processor.
FILTER
STATE: Enables or disables the filter
FILTER GRAPH: Shows a visualisation of the current filter settings. Tap/click and drag left and right to adjust the filter’s cutoff frequency. Tap/click up and down to adjust the filter’s resonance.
FILTER TYPE: Use the buttons below the filter graph to select the type of filter. The choices are, from left-to-right: low-pass filter, high-pass filter, band-pass filter, notch filter.
KBD / KEYBOARD: Sets the degree to which the note being played impacts on the filter’s cutoff frequency. When set to 0% the filter cutoff is unaffected by the note being played. As the setting is increased, so the filter cutoff will increase the higher the note that’s played.
ENV: Sets the strength of the filter envelope’s impact on the filter cutoff frequency.
ADSR
This pair of ADSRs are hard-wired to control the sound’s amplitude and the filter cutoff respectively.
ADSR FADERS: The envelope faders allow you to set the envelope’s attack time, decay time, sustain level and release time (respectively) in a visually intuitive manner. The resulting envelope shape is shown overlaying the faders.
VELOCITY: Determines how sensitive the envelope is to note-on velocity (aka “velocity”, “strike”). At low settings, note-on velocity has a small impact on the envelope’s magnitude/strength; at high settings, note-on velocity has a large impact on the envelope’s magnitude/strength.

MODULATION
BLEASS SampleWiz 2 has a pair of freely assignable LFOs (Low Frequency Oscillators) and a third ADSR envelope. Each source can be assigned to up-to two destinations.
LFO 1 / LFO 2
SHAPE: Sets the shape of the LFO waveform. Choose from sine, triangle, sawtooth up, sawtooth down, square and sample-and-hold.
SYNC MODE: Choose the LFO’s synchronisation mode:
FREE uses internal timing for the LFO
BEAT synchronises the LFO to the host DAW’s tempo. If using the standalone iOS app, use the tempo, start and stop buttons to simulate a host DAW.
TRIG uses internal timing for the LFO, and restarts the LFO when new notes are played.
RATE: Sets the time taken for the LFO to complete one cycle of its waveform. The Rate is expressed as milliseconds and seconds when in FREE or TRIG sync mode; in BEAT mode it is expressed in terms of note length.
OFFSET: When in BEAT sync mode, creates a timing offset between the beat and the LFO’s position.
DESTINATION (x2): Use the drop down menus to specify up-to two parameters that will be modulated by the LFO.
AMOUNT (x2): Scales the strength of the LFO’s impact on the corresponding destination parameter. Negative values will reverse the polarity of the modulation – in other words, when the LFO is rising the destination parameter’s value will be falling.
ASSIGNABLE EG
The Assignable EG is an additional envelope generator that can be used to modulate any two parameters.
ADSR FADERS: The envelope faders allow you to set the envelope’s attack time, decay time, sustain level and release time (respectively) in a visually intuitive manner. The resulting envelope shape is shown overlaying the faders.
VELOCITY: Determines how sensitive the envelope is to note-on velocity (aka “velocity”, “strike”). At low settings, note-on velocity has a small impact on the envelope’s magnitude/strength; at high settings, note-on velocity has a large impact on the envelope’s magnitude/strength.
DESTINATION (x2): Use the drop down menus to specify up-to two parameters that will be modulated by the envelope.
AMOUNT (x2): Scales the strength of the envelope’s impact on the corresponding destination parameter. Negative values will reverse the polarity of the modulation – in other words, when the envelope is rising the destination parameter’s value will be falling.
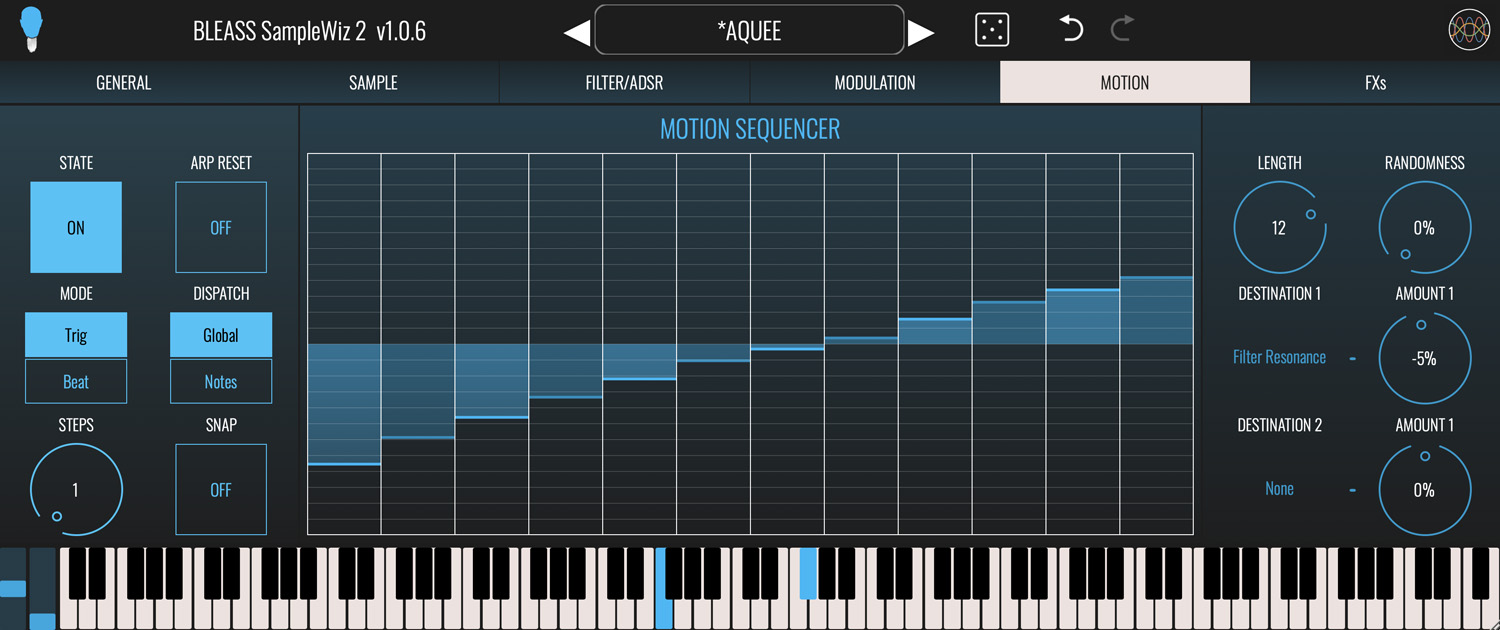
MOTION
BLEASS’ unique Motion Sequencer generates rhythmic movement and repeating patterns of modulation values that can be assigned to any two modulation destinations.
MOTION
STATE: Enables or disables the Motion Sequencer
MODE: Determines the type of event that will cause the Motion Sequencer to advance to its next step.
TRIG: The Motion Sequencer will advance when a note is played.
BEAT: The Motion Sequencer will advance based on the host DAW’s beat. If using the standalone iOS app, use the tempo, start and stop buttons to simulate a host DAW.
STEPS: Sets the number of trigger/beat events that have to occur in order for the Motion Sequencer to advance to its next step.
ARP RESET: When enabled and the arpeggiator is active, the Motion Sequencer will return to its first step when a new chord is played. Has no effect with the arpeggiator is disabled.
DISPATCH: Changes how the Motion Sequencer modulation values are implemented.
GLOBAL: Motion Sequencer modulation values are applied globally to all voices.
NOTES: Motion Sequencer modulation values are applied on a per-note basis.
SNAP: Enables or disables the value snapping grid on the Motion Sequencer’s step programming panel.
STEP PROGRAMMING PANEL: Drag a step’s fader to set the value that will be sent when that step is active.
If using the desktop plugin you can also right-click on a step to set a specific numeric value between 0 and 1, where 0 represents a step’s maximum negative position, 0.5 its central position, and 1 the maximum positive position.
LENGTH: Sets the number of steps within the pattern.
RANDOMNESS: Introduces a random element to the value of each step.
DESTINATION (x2): Use the drop down menus to specify up-to two parameters that will be modulated by the Motion Sequencer.
AMOUNT (x2): Scales the strength of the Motion Sequencer’s impact on the corresponding destination parameter. Negative values will reverse the polarity of the Sequencer’s pattern.

FXs
Sweeten your sound and add some final polish with delay and reverb processors.
DELAY
Add stereo echoes and repeats to your sound using the delay processor.
STATE: Enables or disables the delay processor.
MODE: Sets the delay’s synchronisation mode. In Free mode, delay time is set in milliseconds and seconds. In Sync mode the delay time is based on the host DAW’s tempo, with delay time set in terms of note length. If using the standalone iOS app, use the tempo, start and stop buttons to simulate a host DAW.
TIME: Sets the delay time either in absolute milliseconds and seconds, or in note lengths relative to the host DAW’s tempo.
PING-PONG: Enables or disables the delay’s ping-pong mode. When enabled, delay repeats alternate between the processor’s left and right channels. Note that the width of the ping-pong effect that you hear is determined by the delay processor’s Stereo setting.
LOW PASS & HIGH PASS: Sets the low- and high-pass filter cutoffs for the delay repeats.
FEEDBACK: Determines how much of the delayed signal should be fed back to the processor’s input. Higher values lead to more repeats.
STEREO: Works in conjunction with the Ping-Pong mode to set the stereo width of the alternating repeats. At +/-100%, repeats are panned hard left and right; at 0%, repeats are all panned centrally. Only available when Ping-Pong mode is active.
MIX: Sets the wet/dry balance of the delay processor. At 0% only the dry input signal is heard; at 100% only the delayed signal is heard.
REVERB
Use SampleWiz 2’s reverb effect to simulate rooms and acoustic spaces. The processor can introduce modulation to the reverb reflections, and has a Shimmer feature that creates delayed and pitch-shifted copies of the sound.
STATE: Enables or disables the reverb effect.
LOW CUT: Sets the frequency below which the prominence of low frequencies within the reverb sound will be reduced.
PRE DELAY: Introduces a short delay between the source sound and the onset of the resulting reverb.
ROOM SIZE: Determines the reflective character of the reverb effect.
MOD RATE: Sets the speed at which the pitch of the reverb reflections are modulated. This can be used to thicken the reverb sound, or to create special effects.
MOD AMOUNT: Sets the strength of the reverb’s pitch modulation.
SHIMMER PITCH: Shimmer introduces a pitch-shifted delay line into the reverb processor. This control sets the amount of pitch shift, in semitones, that will be applied to the Shimmer delay line.
DELAY TIME: Sets the delay time for the pitch-shifted Shimmer delay line.
SHIMMER AMOUNT: Determines the balance between the reverb sound and the Shimmer delay line. At 0% no Shimmer repeats will be heard; at 100% only Shimmer repeats will be heard.
LENGTH: Sets the overall decay time of the reverb.
COLOR: Sets the frequency above which the prominence of high frequencies within the reverb sound will be reduced. The higher the setting the brighter the resulting reverb sound will be.
MIX: Sets the wet/dry balance of the reverb processor. At 0% only the dry input signal is heard; at 100% only the reverb signal is heard.
TUTORIALS & REVIEWS:
BLEASS SampleWiz 2 Now Available!