
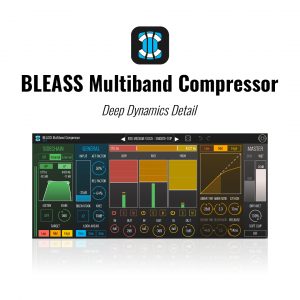
BLEASS Multiband Compressor is the perfect tool for injecting loudness, power and punch into your mixes, stems and tracks. Whether you are creating music on-the-move on your iPad, producing your masterpiece in the studio, or doing both, BLEASS Multiband Compressor dispenses detailed precision control over your music’s dynamics.

One of the secret weapons of professional mix and mastering engineers, multiband dynamics processors have various advantages over conventional broadband processors. By separating your audio into three frequency bands, and processing each independently, BLEASS Multiband Compressor ensures that loud passages and transients in one frequency range do not impact on how the other bands behave. This eliminates the “volume pumping” effect often exhibited by broadband compressors, making BLEASS Multiband Compressor the perfect tool for processing drum kits, synths, pianos and – of course – full mixes and stems. The plugin works brilliantly with other sources too, from solo instruments to vocals and spoken voice.
Unusually for a multiband processor, each of BLEASS Multiband Compressor’s three bands features a dual stage dynamics processor. This consists of an Above stage that senses for and processes signals whose level exceeds the Above threshold, and a Below stage that senses for and processes signals that are quieter than the Below threshold. Additionally, each stage can operate as either a compressor or, by dialing in Ratio values below 1:1, an expander. Altogether this makes for phenomenally versatile control over the volume and loudness of your mixes, stems and parts.
Another innovative feature of BLEASS Multiband Compressor is its flexible sidechain system. This allows you to choose which bands will key from the input signal in the normal way, and which will key from a filtered and/or external signal. This is ideal for corrective work such as controlling resonances, sibilances and other unwanted artefacts, but is also a fabulous creative tool, allowing for stylish ducking effects and ultra-deep dynamics control.
Rounding things off, the plugin provides comprehensive output level and dry / wet balance control, along with a soft clipping feature that ensures overly-hot signals don’t become nasty and harsh, but instead take on a classic valve-like saturation character.
BLEASS Multiband Compressor stands out for its great sound, innovative features, versatile dynamics control, and exceptional efficiency.
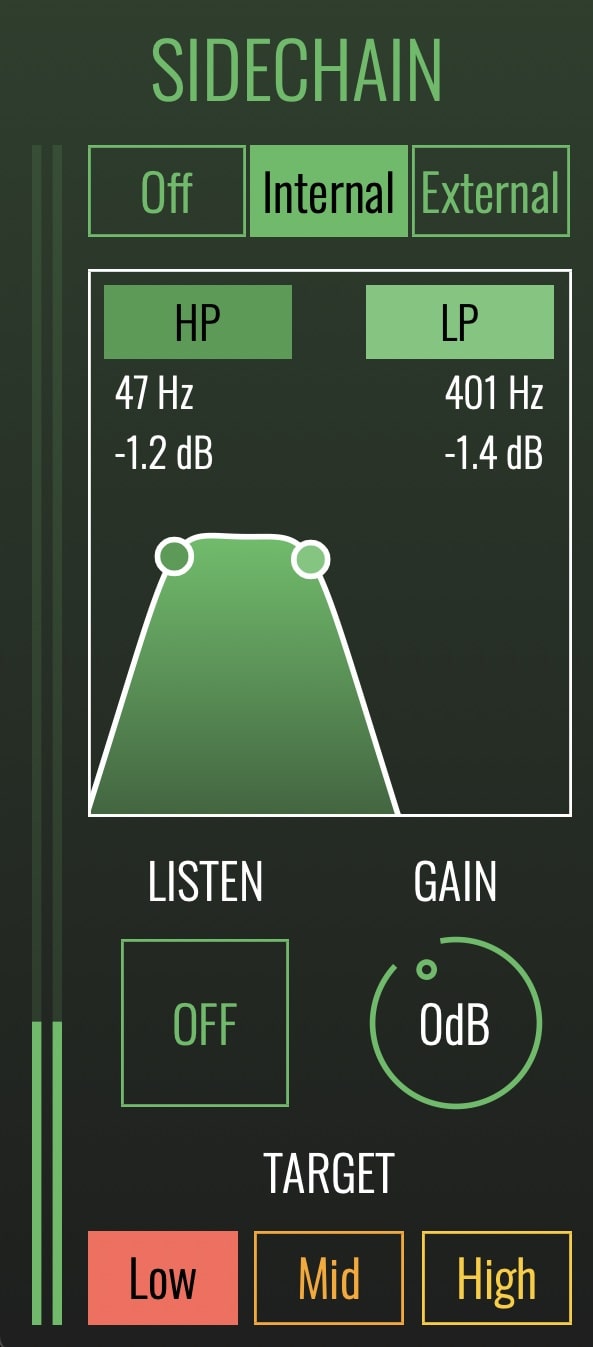
SIDECHAIN
A compressor’s sidechain (sometimes known as a “key”) is the signal that the processor uses to measure when – and by how much – to adjust the gain of the signal being processed.
There are 3 types of Sidechain Source:
(Determines where the sidechain signal is sourced from)
OFF: The sidechains for all bands are fed with an exact copy of the signal being processed.
INTERNAL: The sidechains for bands activated under TARGET are fed with a copy of the signal being processed that has been fed through the Sidechain Filters. Bands that are not targeted will operate as though the Sidechain Source were set to OFF.
EXTERNAL: The sidechains for bands activated under TARGET are fed with a separate signal. The method of bussing a track or signal to the plugin’s sidechain input varies depending on the DAW being used. The External sidechain input is processed by the Sidechain Filters (if enabled). Bands that are not targeted will operate as though the Sidechain Source were set to OFF.
Sidechain Filters: Applies high- and/or low-pass filtering to the sidechain signal. Use the “HP” and “LP” buttons to enable or disable the high pass and low pass filter (respectively). Drag the filter handles left or right to adjust a filter’s cutoff frequency, and drag up or down to adjust a filter’s resonance. The Sidechain Filters do not operate when the Sidechain Source is set to OFF, and are not applied to any bands whose Target setting is not enabled.
Listen: When enabled, allows you to monitor and check the sidechain signal, and hear the results of any Sidechain Filters that are being applied.
Gain: Adjusts the volume level of the sidechain signal. This can be a useful way to adjust the sensitivity of all compressor bands uniformly.
Target: Sets the compressor bands that will use the Internal or External sidechain signal. Any bands not enabled will act as the Sidechain Source were set to OFF.
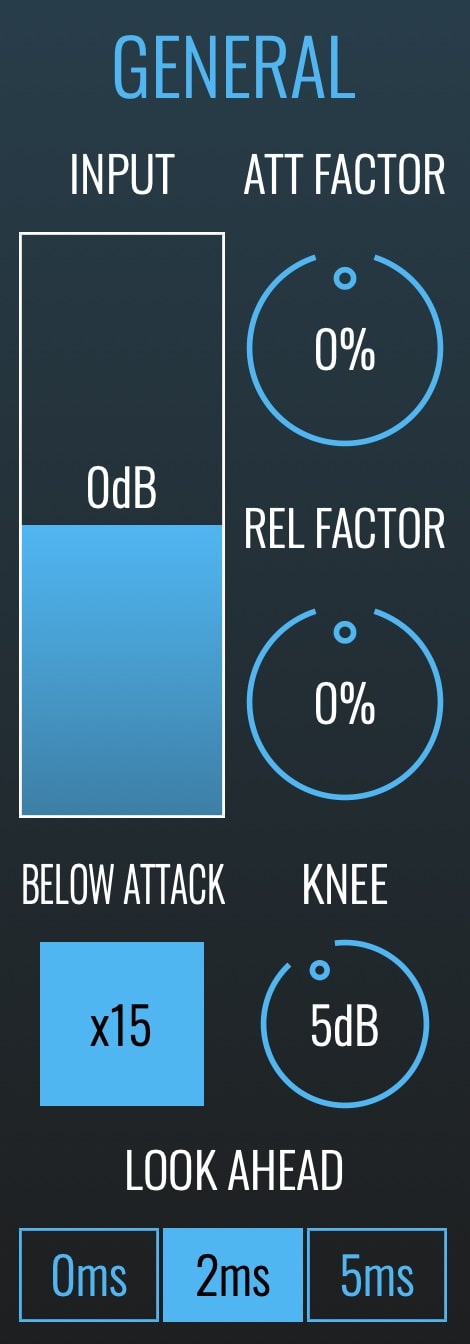
GENERAL
Input: Sets the input signal level.
Att Factor: Globally adjusts all compressor attack times. Use positive values for faster attack, and negative value for slower attack.
Rel Factor: Globally adjusts all compressor release times. Use positive values for faster release, and negative value for slower release.
Below Attack: Applies a multiplier of x2 or x15 to the Below Compressor attack times. (Also, the release time for the below compressor is the displayed value multiplied by 0.1. So with a release of 30ms, the release time for the below compressor is 3ms.)
Knee: Adjusts how the compressor responds when the signal level is near the threshold. Low values give a “hard” knee in which full-ratio compression is applied as soon as the signal exceeds the threshold. Higher values give a “softer” knee whereby the compression ratio starts to increase before the signal exceeds the threshold, and full-ratio compression is not achieved until the signal level is some way above the threshold. Softer knees tend to be more transparent, but can allow sudden, loud transients to escape compression.
Look Ahead: Adds a short delay of 2ms or 5ms to the signal being processed but not to the sidechain. It takes a short amount of time a compressor to achieve full-ratio compression, especially when using longer attack times and softer knees, and this can allow unwanted transients to pass through the compressor unaffected. The Look Ahead delay is useful as a means of preventing this from happening – in a sense it pre-prepares the compressor for the upcoming audio. The Look Ahead delay is automatically compensated by your DAW so no latency can be experienced.
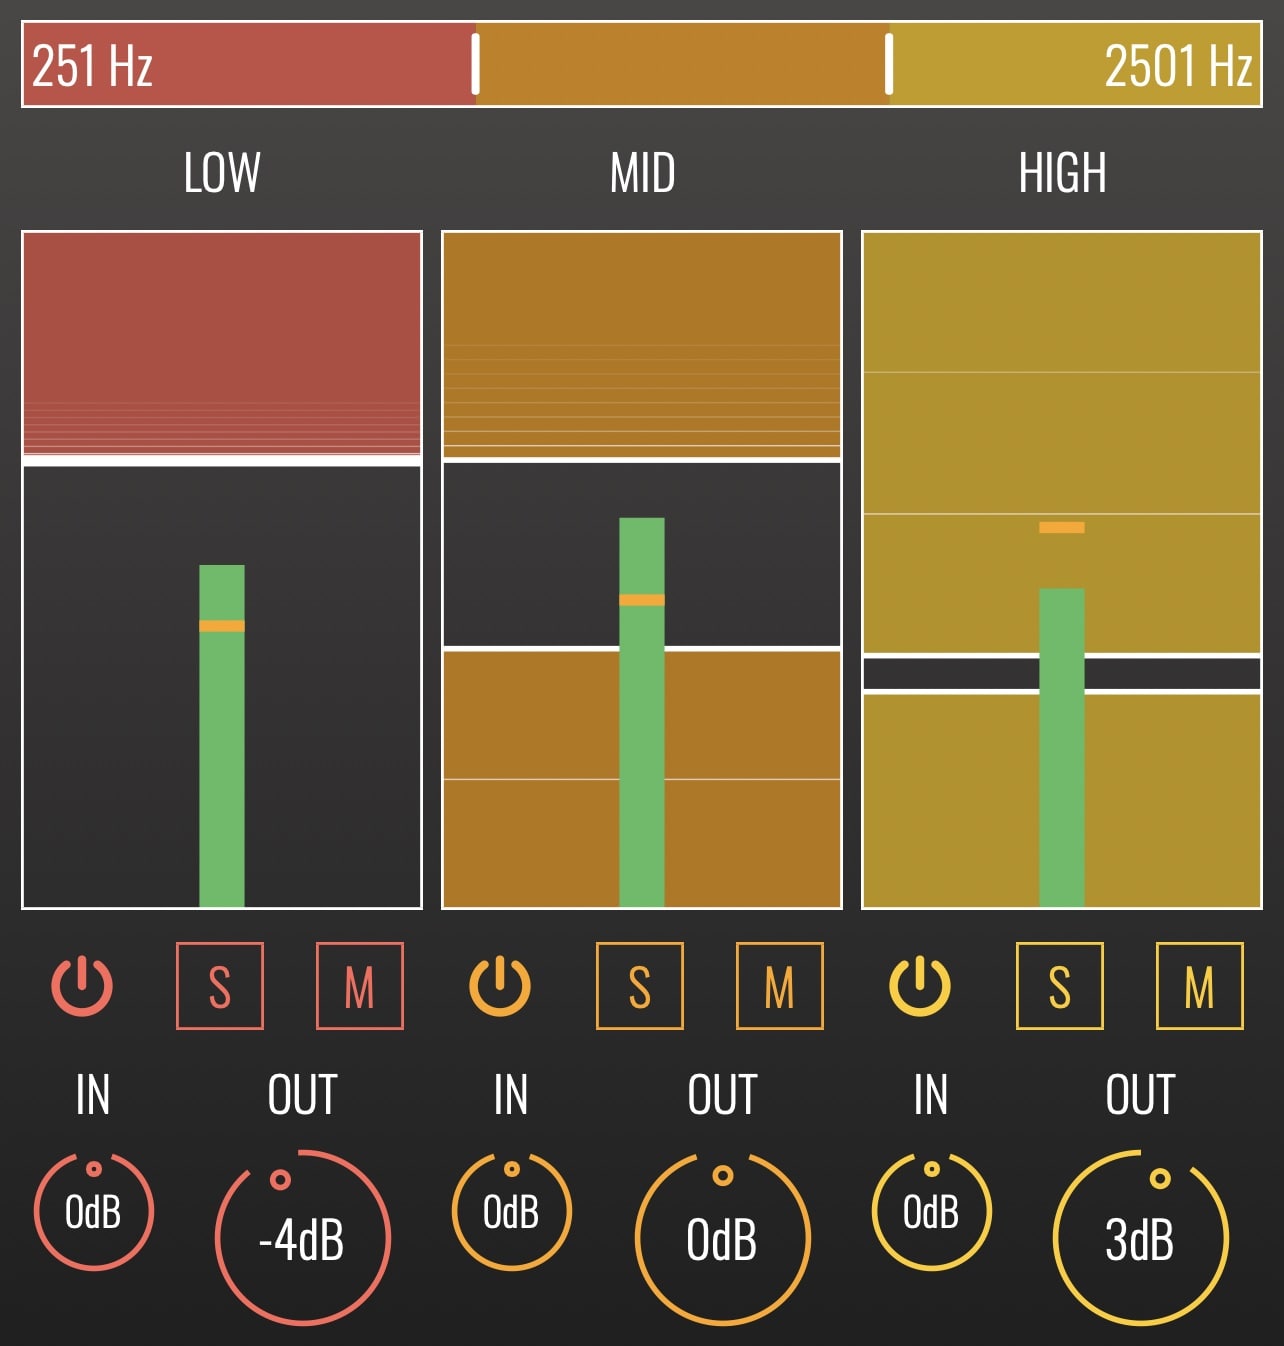
COMPRESSOR SETTINGS:
Central Panel: The central panels allows you to view and edit settings of all three bands within a single view.
Crossover: The vertical bar at the top of the window allows you to set the crossover frequencies of the three compressor bands. Drag the left boundary marker to set the low/mid crossover frequency, and the right boundary marker to adjust the mid/high crossover.
Band Thresholds: Each band features two thresholds, modified by dragging the markers on a band’s visualisation. The current band level is shown as an overlay.
The upper marker controls the Above compression threshold. When the signal level exceeds this threshold Above compression is applied.
The lower marker controls the Below compression threshold. When the signal level is less than this threshold Below compression is applied.
Band On/Off: Enable or bypass a band’s processing by clicking on its power symbol.
Band Mute: Enable this button to silence a band completely.
Band Solo: Enable this button to silence the other two bands so that you can focus on just one.
Band In: Controls a band’s input level.
Band Out: Controls a band’s output level.
(It should be noted that the filter used to create the band isn’t in linear phase.)
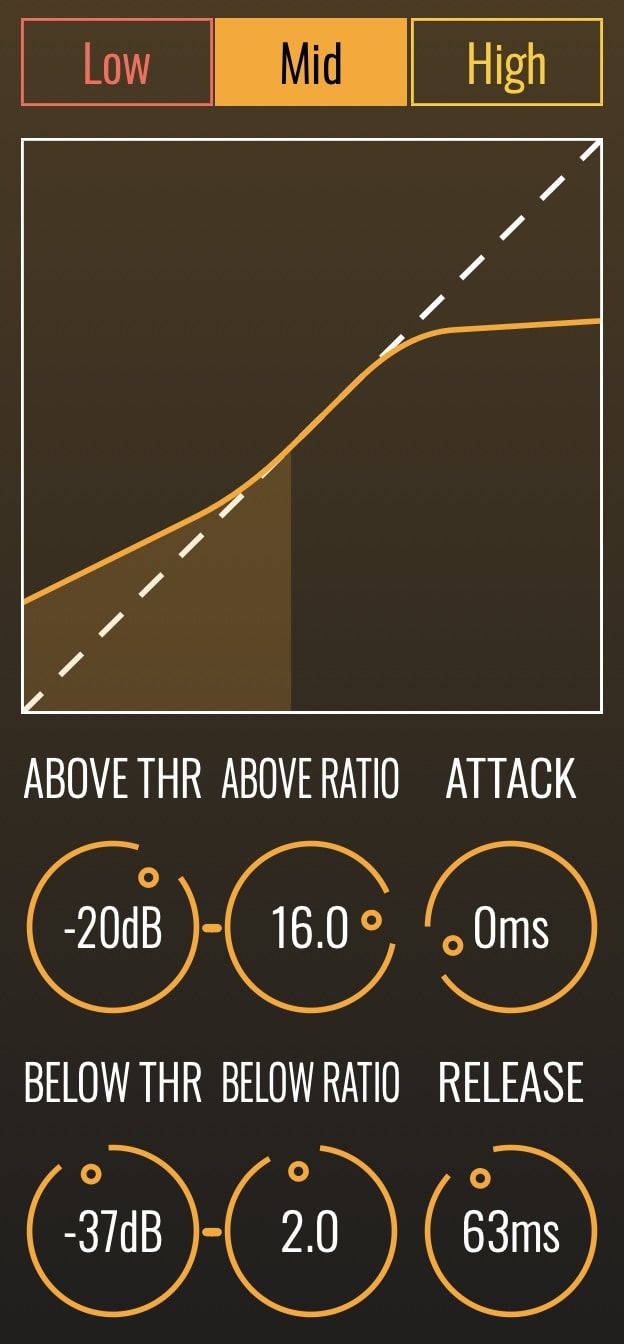
SIDE PANEL
The side panel, to the right of the central panel, shows additional settings for one band at a time.
Low / Mid / High: Choose which band to view within the side panel
Compression Curve Visualisation: Displays the compression curve that results from the band’s current settings, with the band’s signal level overlaid. Drag up-and-down on the graph to adjust Above and Below thresholds in tandem.
Above Thr: Alternative method for setting the band’s Above threshold.
Above Ratio: Sets the compression ratio that will be applied to the band when the Above threshold is exceeded. Values above 1 result in standard downward compression. Values below 1 result in upward expansion.
Below Thr: Alternative method for setting the band’s Below threshold.
Below Ratio: Sets the compression ratio that will be applied to the band when the signal level is less than the Below threshold. Values above 1 result in upward compression. Values below 1 result in downward expansion.
Attack: Sets the compression attack time for the band.
Release: Sets the compression release time for the band.
MASTER
Dry: Sets the master level of the unprocessed output signal. Only has an affect when the Dry/Wet balance is less than 100%.
Wet: Sets the master level of the processed output signal. Only has an affect when the Dry/Wet balance is greater than 0%.
Dry/Wet: Balances between the unprocessed “dry” signal and processed “wet” signal.
Soft Clipping: Enables a soft clipper applied when the output signal exceeds 0dB.

DEMOS & TUTORIALS


