BLEASS Saturator is a creative saturation and distortion toolbox that lets you stamp your authority all over your audio. Roast your basses, crush your drums, and make your leads explode from a mix, all from the relaxing comfort of the plugin’s colourful and intuitive interface.
The Drive module introduces analogue-style overdrive into your signal, from a gentle warming all the way to a veritable roasting. The module’s built in EQ allows precise control over the tonal character of the saturation as well.
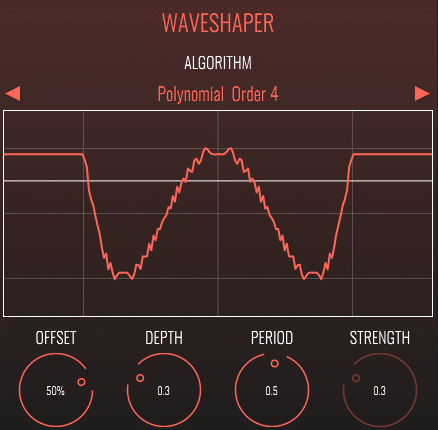
The Waveshaper distorts your audio using a second waveform. The way this happens depends upon the waveshaping algorithm that is used – BLEASS Saturator has nine to choose from. The algorithm has a significant impact on the character of the distortion that is produced. With its clear visualisation, and detailed-but-intuitive control over key parameters of the waveshaping algorithms, the Waveshaper module offers a near infinite choice of sonic colourations and distortions.
BLEASS Saturator’s Bit module simulates the distortion characteristics of analogue-to-digital conversion. We’re all familiar with the pristine sound quality that is produced when both sample rate and bit depth are suitably high, but dragging these values down can create wonderful glitches and distortions that are fundamentally digital in character. Further creative possibilities are presented by the option of applying the Bit module either before or after the Waveshaper module.
The built-in LFO can be routed to any of the plugin’s parameters, and can be synced to the host’s beat and tempo. This allows you to explore evolving, shifting and rhythmic distortions that would be hard to achieve with conventional saturators.
Gentle settings can create pleasingly warm and fuzzy results, but despite its small footprint and lightweight CPU usage, BLEASS Saturator has the strength to hit your audio like a ton of bricks!
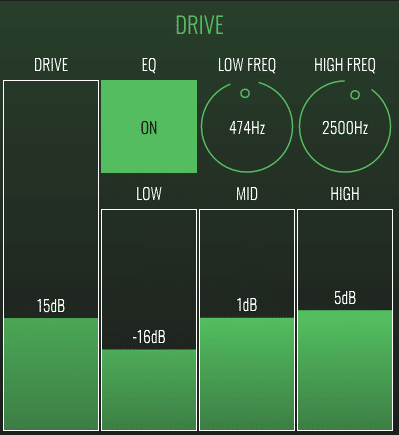
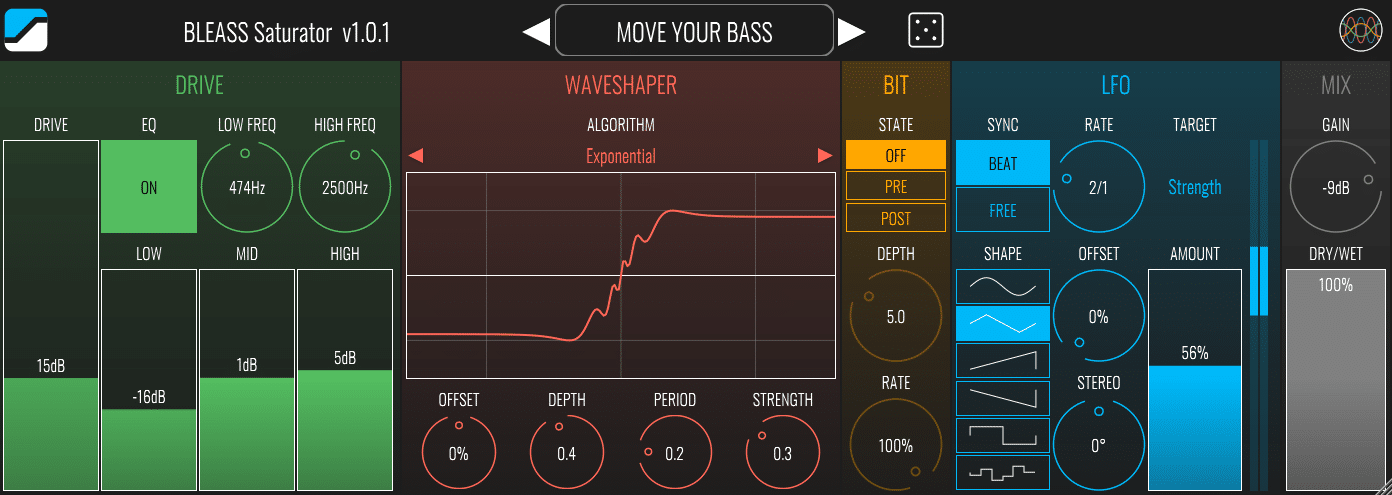
DRIVE SECTION
DRIVE: Sets the amount of gain to apply to the Drive module’s input.
EQ ON/OFF: Enables and disables the Drive module’s EQ section.
LOW FREQ: Sets the crossover frequency between the EQ’s low and mid bands.
HIGH FREQ: Sets the crossover frequency between the EQ’s mid and high bands.
LOW / MID / HIGH: User the faders to adjust the gain of each EQ band.
WAVESHAPER SECTION
ALGORITHM: Sets the waveshaping algorithm that will be used to distort the input signal. Step back and forth through the nine algorithms on offer – the resulting waveshape will be shown in the visualisation.
OFFSET: Offsets the phase of the waveshaper’s waveform, causing it to interact differently with the source signal. You can also adjust the Offset by dragging up and down in the algorithm’s visualisation.
DEPTH: Controls the strength of feedback within the waveshaper. Higher settings result in a more complex waveshaper, and so a more distorted sound. You can also adjust the Depth by dragging left and right in the algorithm’s visualisation.
PERIOD: Determines the frequency of the waveshaper’s waveform. Has a dramatic impact on the resulting distortion.
STRENGTH (not available to all algorithms): Controls the intensity of the waveshaper’s impact on the signal.
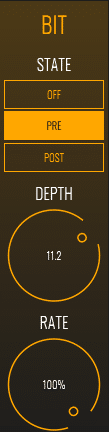
BIT SECTION:
STATE: Sets the operating mode of the bit crusher distortion.
- OFF: No bit crushing will be used.
- PRE: Bit crushing will be applied before the Waveshaper module.
- POST: Bit crushing will be applied after the Waveshaper module.
DEPTH: Determines the effective bit depth of the processed signal. Lower values result in more extreme glitches and distortions.
RATE: Determines the effective sample rate of the processed signal. Lowering the value creates increasing aliasing distortions in the signal.
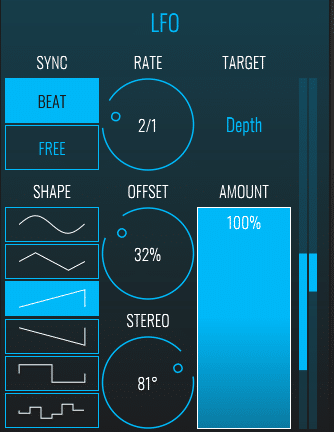
LFO SECTION
SYNC: Select BEAT mode to synchronise the LFO to your DAW’s timing and tempo. Use FREE mode to have the LFO run freely at a specific rate.
RATE: Sets the time taken for the LFO to complete one cycle. When Sync is in BEAT mode, the Rate is set as a fraction of a beat. When Sync is in FREE mode, the Rate is set in Hz (I.E. number of cycles per second).
TARGET: Open the popup menu to select the parameter that will be driven by the LFO.
SHAPE: Sets the waveform that will be used by the LFO. Options are (from top to bottom): Sine, triangle, sawtooth up, sawtooth down, square and sample-and-hold.
OFFSET: When Sync is in BEAT mode the Offset dial moves the start/end point of the LFO’s cycle with respect to the beat.
STEREO: Creates a phase offset between the left and right channels of the LFO’s waveform. When set to 0°, both channels modulate together in lock-step. Increasing or decreasing the Phase introduces an ever greater offset between the channels until, at 180°, they are fully inverted from each other (that is, the left channel will be rising whilst the right channel is falling, and vice-versa).
LFO Bar Meter: The LFO bar meter visualises the action of the LFO.

TUTORIALS & REVIEWS: