
BLEASS Voices is a flexible and powerful audio plugin dedicated to pitching, transforming, doubling and harmonizing vocals and other monophonic sources. With a total of 12 pitch shifted voices, each providing detailed control over pitch, formant, tone, width and placement, BLEASS Voices will redefine your vocal creativity and unleash your inner choir.
Four of BLEASS Voices’ harmonized voices can be transposed independently by up to an octave higher or lower, or can be flattened to a chosen pitch. The remaining eight voices are triggered via MIDI, transposing the input signal to match the incoming MIDI notes. Coupled with BLEASS Voices’ deep implementation of MPE, this lets you play vocal chords that ooze expressiveness and nuance, and vocal solos with realistic glides, trills and embellishments.
Alongside the extensive MPE support, BLEASS Voices also includes synth-style modulators that add new dimensions of movement and variation to your vocal performances. With two LFOs, an envelope follower and a pattern sequencer, BLEASS Voices is like a performance synth for vocals!
All voices have access to the plugin’s intelligent pitch correction algorithm that forces the voices into a selected key and scale. Additionally, as well as feeding into the master output, each voice has its own independent output buss allowing you to mix and add effects to those voices as though they were standalone recordings*.
BLEASS Voices works with fundamental frequencies ranging from 66Hz (approximately C1**) to 5.2kHz (approximately E7**), making this the ideal plugin for tuning, doubling and harmonizing not only your vocal parts, but many other monophonic instrument parts too.
BLEASS Voices also offers a real-time mode for live performances, ensuring ultra-low latency.
BLEASS Voices is available now on Windows, Mac and iOS.
* Accessing independent output busses requires a host DAW that supports multiple outputs from plugins.
** Where C3 = Middle C / MIDI Note #60
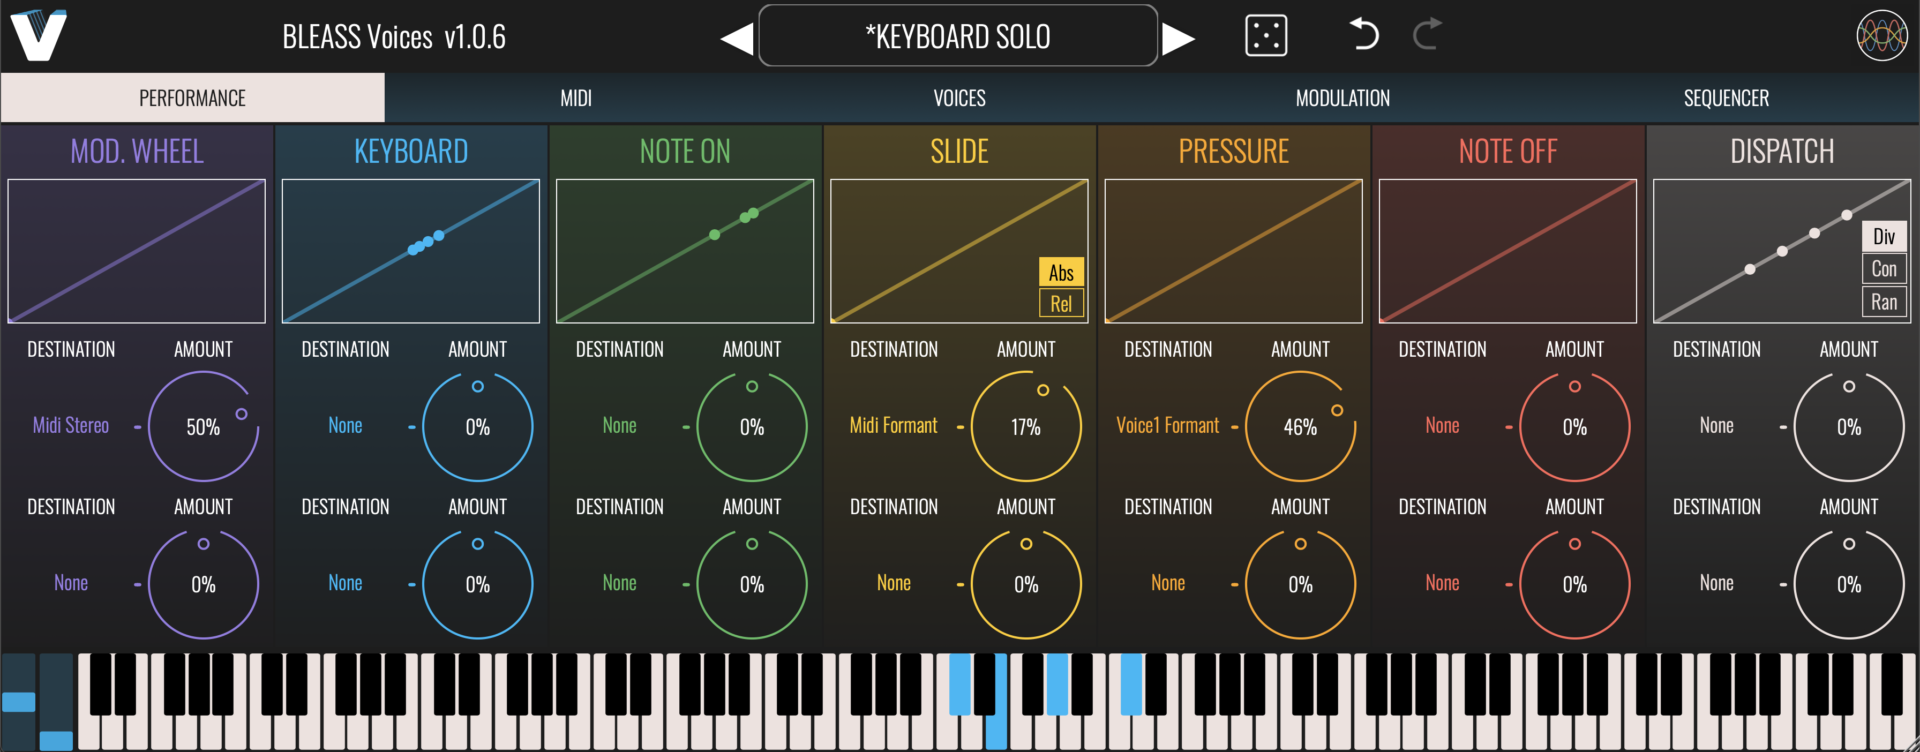
PERFORMANCE TAB
The Performance tab allows incoming realtime performance control messages to be routed to BLEASS Voices’ parameters:
PERFORMANCE CONTROL TYPES
Mod. Wheel: Receives the controller messages from your keyboard’s (or other performance device’s) modulation wheel. Responds to CC-1.
Keyboard: (aka “keyboard tracking”, “keyboard follow”)
The value of this controller message changes depending on the pitch and position of the note you play. Lower notes produce lower values; higher notes produce higher values.
Note On: (aka “note-on velocity”, “velocity”, “strike”)
The value of this controller message is determined by how hard you strike a key on your keyboard (or other performance device). Firmer strikes produce higher values.
Slide: Responds to note-specific CC-74 messages received from MPE-compatible controllers. Slide’s behaviour can be switched between relative and absolute modes.
Pressure: (aka “aftertouch” or “channel pressure”)
The value of this control message is determined by the amount of pressure being applied to a key or pad whilst it is held down. When playing polyphonically, such that different fingers may be applying different pressures, only the highest pressure value will be received.
Note Off: (aka “note-off velocity”, “lift”)
Although rarely utilised, most keyboard controllers measure how quickly you fully remove your finger from a key. The faster you release a key, the higher the note-off velocity value will be. You can think of this as the opposite of note-on velocity.
Dispatch: This control generates a value each time a MIDI note is played. If a new note is played whilst other notes are being held, the resulting Dispatch value will always differ from the values created by the held notes. Dispatch has three operating modes:
DIV (Diverge): The first note triggers the value at the centre of the response curve, and subsequent notes spread out evenly above and below the centre.
CON (Converge): The first two notes trigger the values at the right and left endpoints of the response curve, and subsequent notes converge towards the centre.
RAN (Random): The value assigned to each note is random.
VISUALISATIONS AND ROUTING
Graphs / Sensitivity Curves: Each performance control type has a panel that visualises all of its values, in realtime, as a marker on a graph. Dragging a curve changes its shape, whilst double-clicking a curve returns it to its default shape.
Destination: Each incoming performance controller can be routed to two Voices parameters. Click beneath a “Destination” label to open a menu from where you can select the parameter that will receive the performance controller’s values.
Amount: Controls how strongly the destination parameter will be affected by a performance controller’s value. Positive settings will cause the destination parameter to be increased in response to an increasing controller value; negative settings will cause the destination parameter to be decreased in response to an increasing controller value.
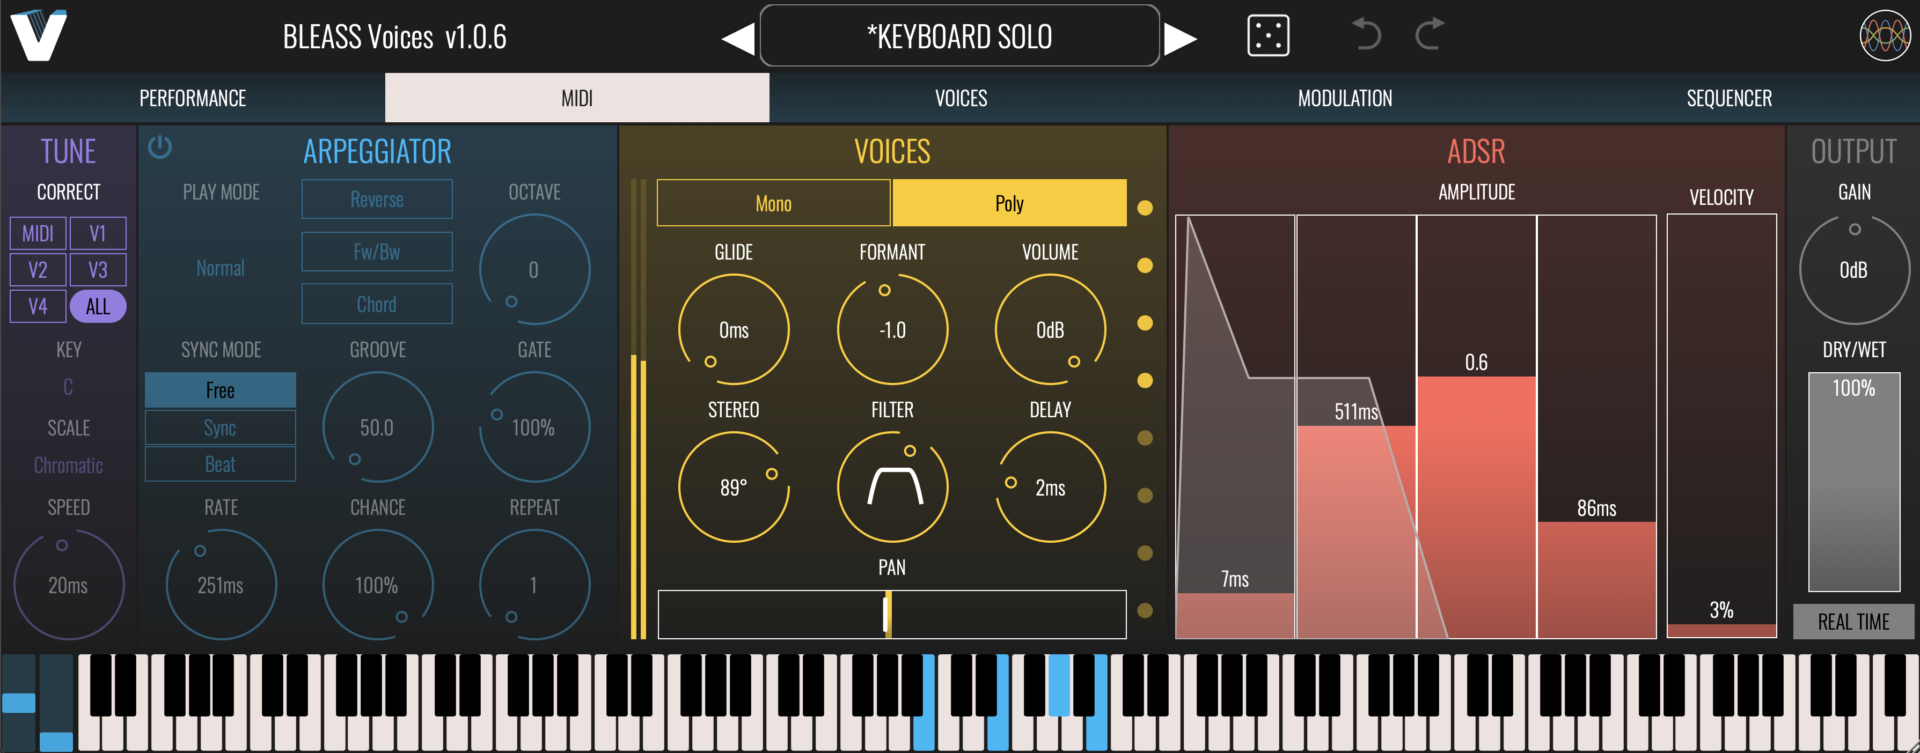
MIDI TAB
Transpose the input signal to match the incoming MIDI notes and control the arpeggiator
(To learn how to route the midi input into BLEASS Voices, check out this tutorial)
TUNE PANEL
The TUNE panel, shown on both the MIDI and VOICES tabs, provides pitch quantisation to the output voices.
Correct: Enable and disable pitch quantisation for the each of the voice sources (MIDI, Voice 1, Voice 2, Voice 3 and Voice 4). Use the ALL button to enable/disable all voice sources at once.
Key: Specifies the musical key that will be used for pitch quantisation.
Scale: Specifies the musical scale that will be used for pitch quantisation.
Speed: Determines the time it takes for a voice to come fully into tune when its output falls outside of the chosen key and scale. Can be used to create portamento-like effects.
ARPEGGIATOR
The Arpeggiator takes any incoming held notes and sends these in a rhythmic sequence to the MIDI Voices processor. This is much the same as the arpeggiators found on many synths.
On/Off Button: Enables or disables the arpeggiator.
Play Mode: Determines the pattern of notes that the arpeggiator will produce.
Reverse: Reverses the arpeggiator’s pattern.
Fw/Bw: The arpeggiator’s playback direction alternates between forward and reverse directions.
Chord: The arpeggiator simultaneously sends all of the held notes as a chord as opposed to triggering each note in sequence.
Sync Mode: Sets the sync mode of the arpeggiator.
FREE uses an internal timer that is set within the instrument.
SYNC synchronises the arpeggiator to the host DAW’s beat.
BEAT synchronises the arpeggiator to the host DAWs beat and synchronises the arpeggiator’s pattern position to the host’s bar-and-beat position.
Rate: Sets the speed of the arpeggiator. The value you enter represents the time between each note that the arpeggiator produces.
In FREE mode, the rate is set in milliseconds
In SYNC and BEAT modes, the rate is set as a note length.
Groove: Applies a shuffle-style groove/rhythm to the arpeggiator’s pattern.
Chance: Sets the probability of whether a note is played or not. At 100% all notes will be played; at 0% no notes will be played.
Octave: Sets the number of additional octaves that the arpeggiator will cover. When set to “0”, only the held notes will be played. When set to “1”, notes that are one octave higher than the triggered notes are added to the arpeggio; higher settings add additional octaves.
Gate: Sets the length of the arpeggiator’s notes, as a proportion of the Rate setting.
Repeat: Sets the number of times each note is repeated before the arpeggiator moves on to the next note.
VOICES
BLEASS Voices can generate up-to eight independent harmony voices from the input signal, driven by incoming MIDI messages.
On/Off Button: Enables or disables the voice.
Mono / Poly: Choose whether incoming MIDI notes should be handled in a monophonic or polyphonic manner.
Glide: Sets the time taken for the MIDI Voice pitch to ramp from the previously-played note to the currently played note.
Stereo: Applies delay and panning to the generated voices in order to create a wider, more spacious result.
Formant: Adjusts the harmonics within the signal, thereby modifying its timbre, without impacting the pitch of the root note.
Filter: Applies a combined high- and low-pass filter to the generated voices. Turning the control above its midpoint increases the high-pass filter cutoff. Turning the control below its midpoint reduces the low-pass filter cutoff.
Volume: Sets the volume level of the generated voices.
Delay: Applies up-to 200ms of delay to the generated voices.
ADSR: Determines the amplitude envelope applied to voices generated by incoming MIDI notes.
Velocity: Determines how the note-on velocity of incoming MIDI notes impacts on the resulting voice’s volume.
Pan: Sets the left-to-right pan position of the generated voices.
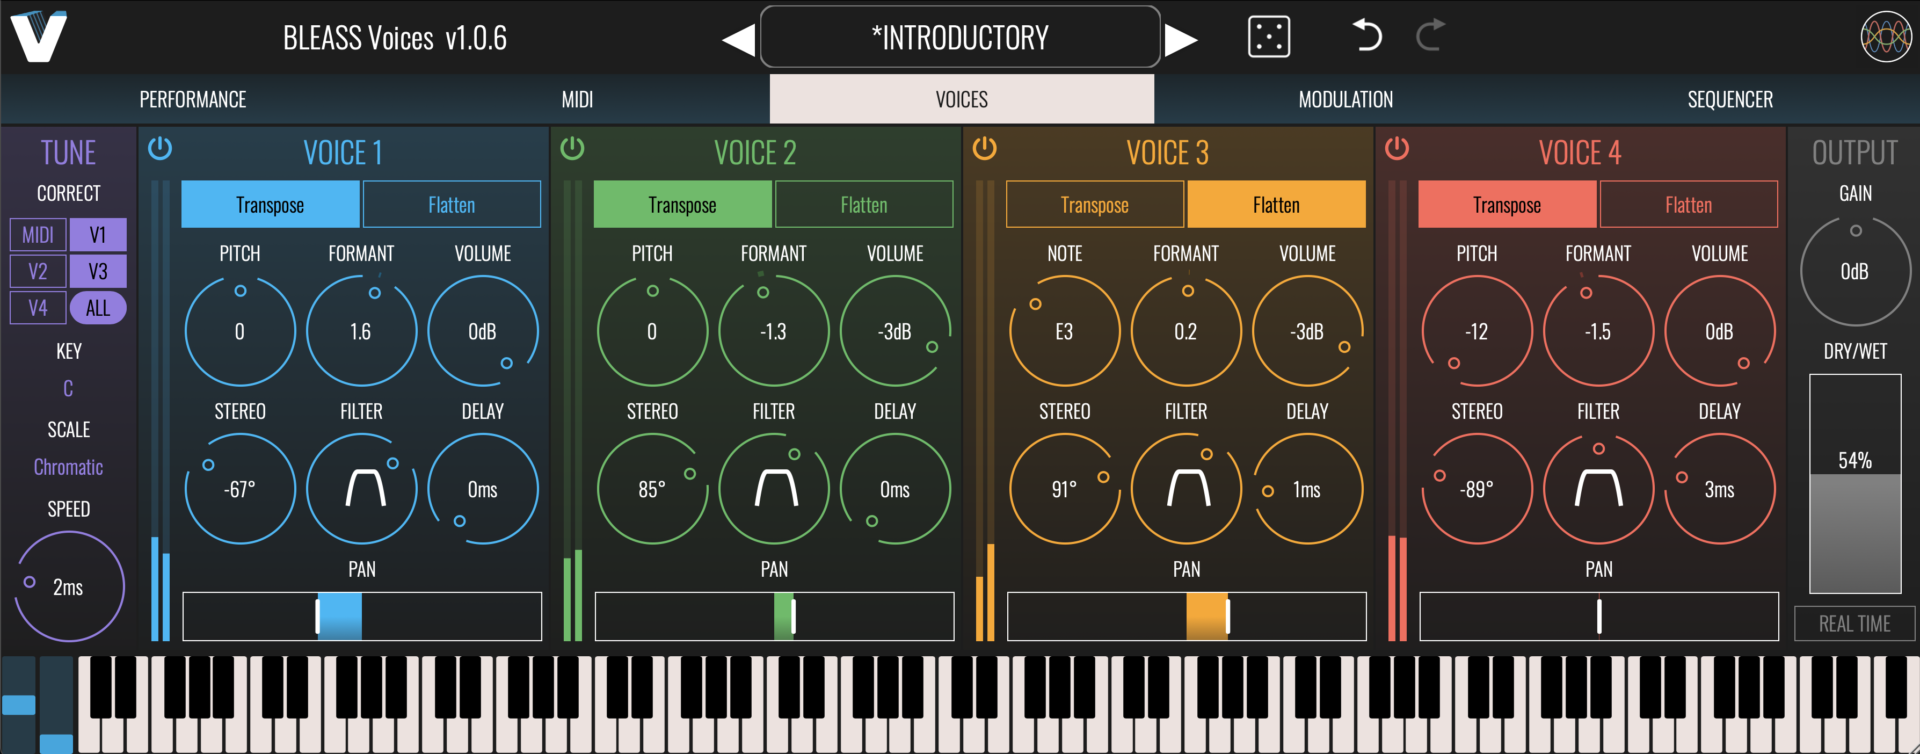
VOICES TAB
The Voices Tab controls the generation of up to to four independent output voices. The controls for each are identical.
VOICE 1 2 3 4
Transpose / Flatten: Choose the pitch shifting mode that will be used.
TRANSPOSE: Transposes the signal by ±12 semitones.
FLATTEN: Fixes the output voice’s pitch at a specific note.
Pitch: In TRANSPOSE mode, sets the amount of pitch shift that will be applied to incoming notes. In FLATTEN mode, selects the note that the incoming signal will be fixed at.
Stereo: Applies delay and panning to the generated voice in order to create a wider, more spacious result.
Formant: Adjusts the harmonics within the signal, thereby modifying its timbre, without impacting the pitch of the root note.
Filter: Applies a combined high- and low-pass filter to the generated voices. Turning the control above its midpoint increases the high-pass filter cutoff. Turning the control below its midpoint reduces the low-pass filter cutoff.
Volume: Sets the volume level of the generated voice.
Delay: Applies up-to 200ms of delay to the generated voice.
Pan: Sets the left-to-right pan position of the generated voice.
OUTPUT
The OUTPUT panel, shown on both the MIDI and VOICES tabs, controls the master output of BLEASS Voices.
Gain: Sets the amount of volume boost or cut to apply to the output signal.
Dry/Wet: Sets the volume balance between the “dry” input signal and the “wet” processed signal.
Real Time: Enables a low-latency mode suitable for processing a live signal. This is helpful when creating cue mixes for performers in the studio, and for use in live performance scenarios.
OFF: the plugin has a latency of ~42/~46ms depending on the sample rate. Effect quality is higher
ON: the plugin works without latency. Effect quality is lower
Note: a bit of dynamic latency (< 4ms) can still be induced be the algorithm depending of voices settings
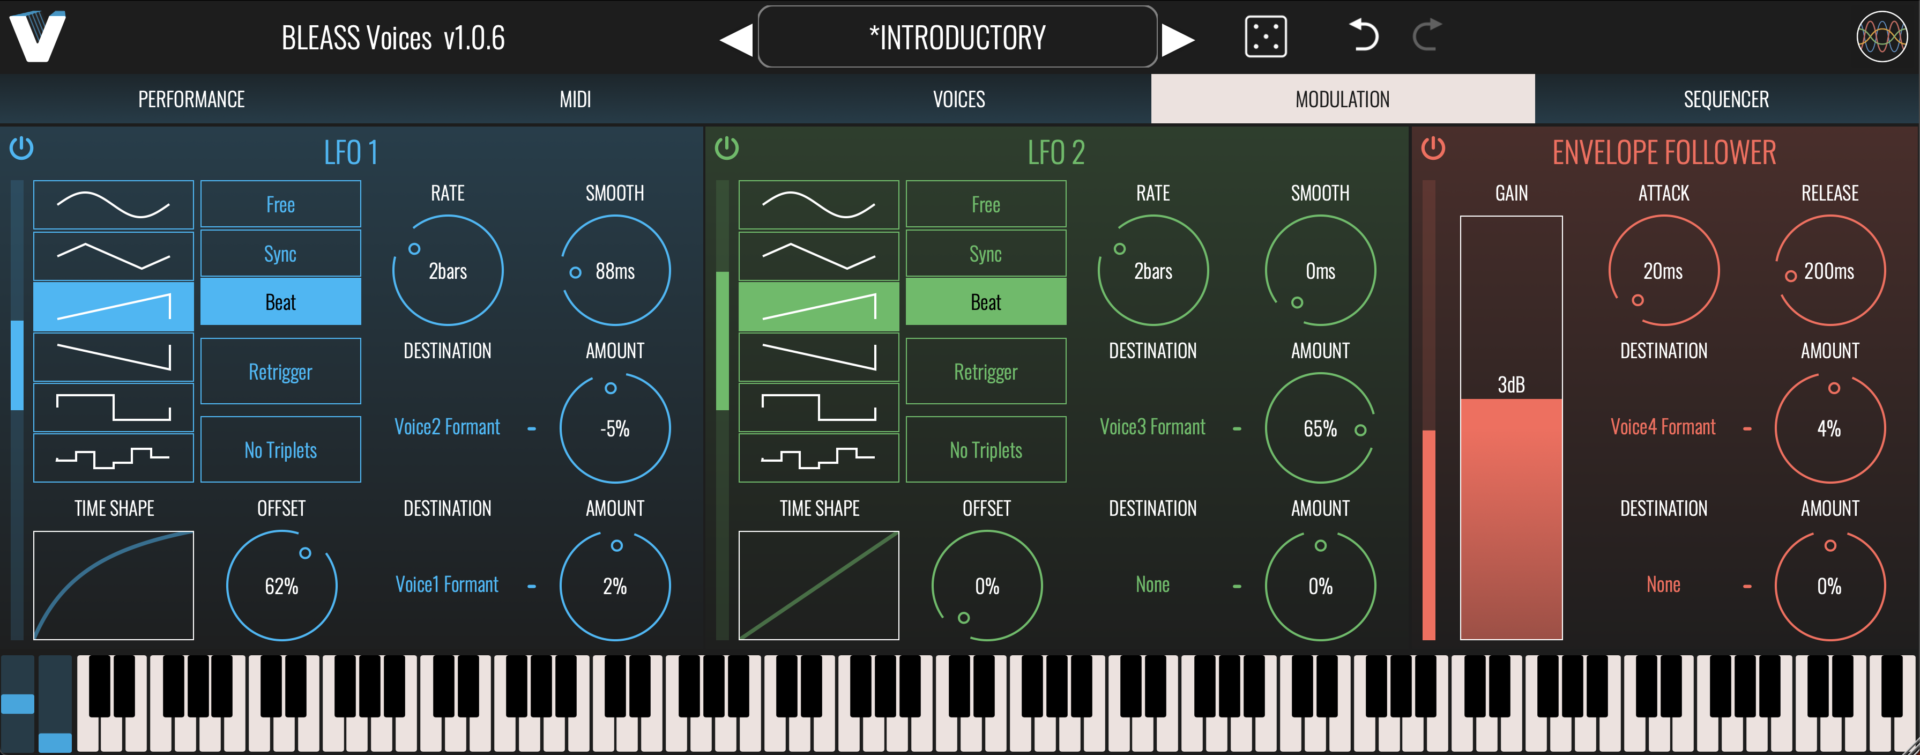
MODULATION TAB
BLEASS Voices provides a pair of advanced LFOs (Low Frequency Oscillators) that can be used to create repeating modulations in many of the processor’s parameters.
LFO 1 / LFO 2
On/Off Button: Enables or disables the LFO.
Shape: Sets the shape of the LFO waveform. Choose from sine, triangle, sawtooth up, sawtooth down, square and sample-and-hold.
Time Shape: The Time Shape graph alters the rate at which the LFO moves through its waveform cycle. When the graph shows a straight line no time shaping will be applied. Dragging the line introduces a curve that illustrates how the LFO’s timing will change through each cycle of the waveform. Double click the graph to reset the time shape. The results of the Time Shape are clearly visible in the LFO’s visualisation.
Sync Mode: Choose the LFO’s synchronisation mode.
FREE uses internal timing for the LFO.
SYNC synchronises the LFO to the host DAW’s tempo.
BEAT synchronises the LFO to the host DAW’s tempo and bar position.
Retrigger: When enabled, causes the LFO to restart its cycle when a note is played.
No Triplets: When enabled, any triplet value selected for the LFO Rate (1/3, 1/6 etc.) will be ignored. Not available in FREE sync mode.
Offset: Offsets the start point of the LFO’s cycle, in effect shifting the LFO’s phase with respect to the trigger note and/or the DAW’s tempo.
Rate: Sets the time taken for the LFO to complete one cycle of its waveform. The Rate is expressed as milliseconds and seconds when in FREE sync mode, otherwise it is expressed in terms of note length.
Smooth: The Smooth parameter imposes a maximum rate of change on the LFO’s output values. This means that, for example, when a saw tooth LFO wave reaches the end of a cycle the LFO value ramps down to the minimum rather than immediately dropping to the minimum, thereby smoothing-out the sudden value change. This can also have the effect of damping the magnitude of the LFO. The results of smoothing are clearly visible in the LFO’s visualisation.
Destination (x2): Specifies a target parameter that will be modulated by the LFO.
Amount (x2): Scales the strength of the LFO’s impact on the assigned destination parameter. Negative values will reverse the polarity of the modulation – in other words, when the LFO is rising the destination parameter’s value will be reduced.
ENVELOPE FOLLOWER
The Envelope Follower converts volume changes within the incoming signal into values that can be used to modulate the processor’s parameters.
On/Off Button: Enables or disables the Envelope Follower.
Gain: Adjusts the volume level of the signal that’s fed to the Envelope Follower’s detector. This affects the sensitivity of the Envelope Follower, as well as determining the maximum strength of its output.
Attack: Determines the attack time of the envelope generated by the Envelope Follower.
Release: Determines the release time of the envelope generated by the Envelope Follower.
Destination (x2): Specifies a target parameter that will be modulated by the Envelope Follower.
Amount (x2): Scales the strength of the Envelope Follower’s impact on the assigned destination parameter. Negative values will reverse the polarity of the modulation – in other words, when the Envelope Follower’s value is rising the destination parameter’s value will be reduced.
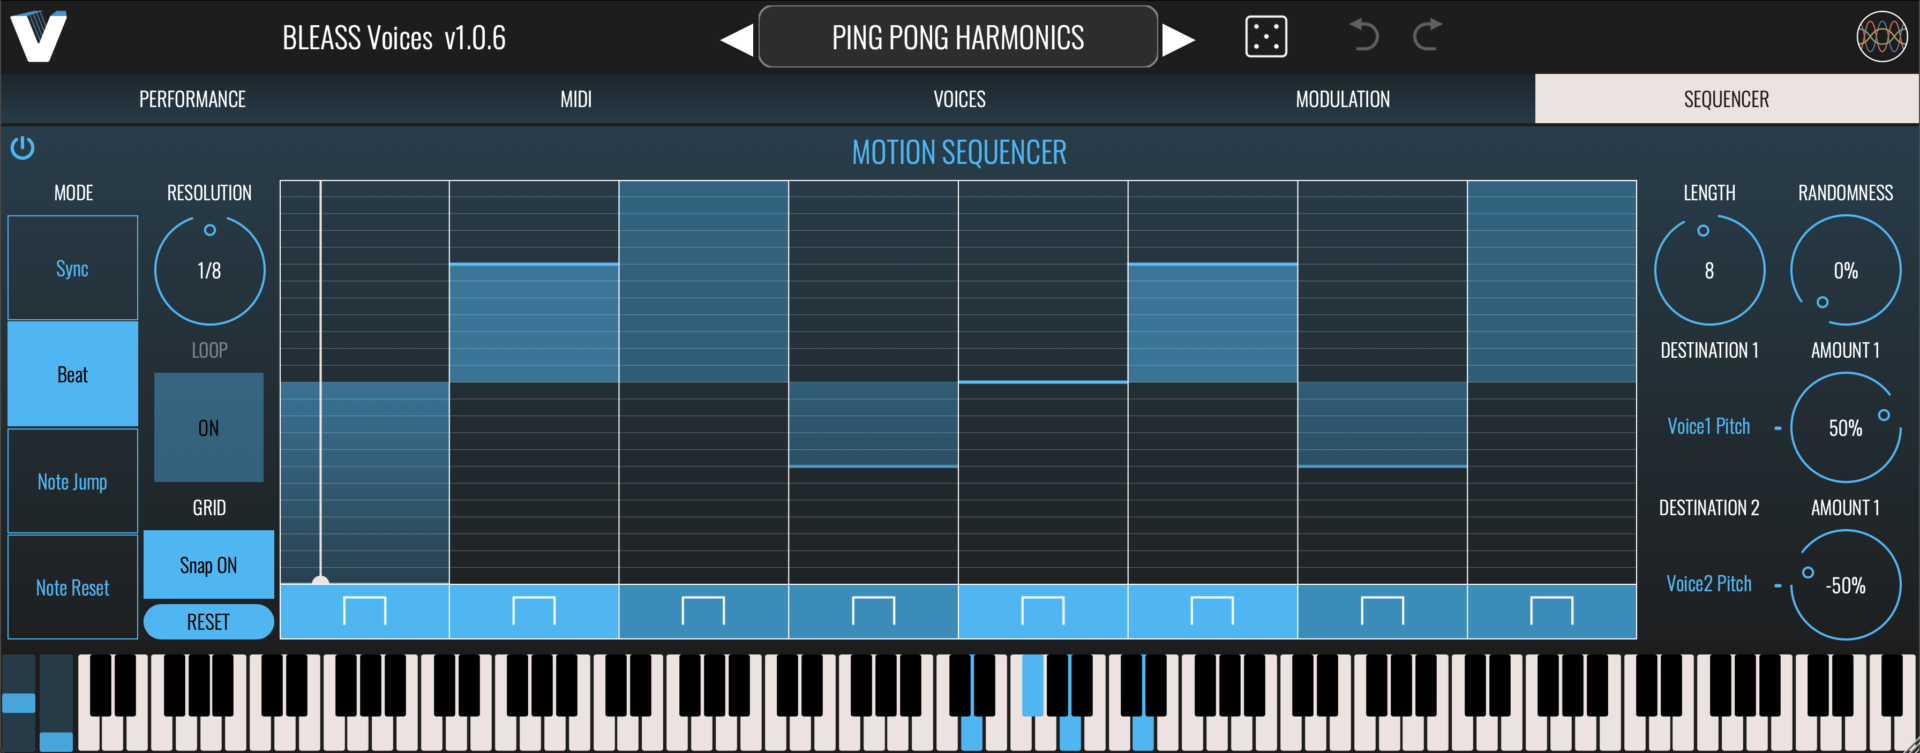
SEQUENCER TAB
The Sequencer allows patterns of values to be sequenced and then used to modulate up to two of BLEASS Voices’ parameters.
SEQUENCER TAB
On/Off Button: Enables or disables the sequencer
Mode: Choose the Motion Sequencer’s synchronisation mode.
SYNC synchronises the Motion Sequencer to the host DAW’s tempo. The DAW does not need to be playing.
BEAT synchronises the Motion Sequencer to the host DAW’s tempo and bar position.
NOTE JUMP the Motion Sequencer steps to its next position each time a note is played.
NOTE RESET synchronises the Motion Sequencer to the host DAW’s tempo, with the sequence restarting each time a note is played.
Resolution: Sets the length of each sequencer step with respect to the host DAW’s tempo.
Loop: Only operates when in NOTE RESET mode. If enabled, the Motion Sequencer will continue to loop through its sequence after a note has been played; if disabled, the Motion Sequencer will stop playing when it reaches the end of the sequence.
Grid: When Snap ON is selected, values you set in the Motion Sequencer will snap to the vertical grid. When Snap OFF is selected, any value can be set within the sequence.
Reset: Resets the sequencer’s steps to their default state.
Sequencer Grid: Click on the sequencer grid to set a value for the corresponding sequencer step. You can also right-click on the grid to open a popup where you can type in a value for the step (1 = maximum; 0.5 = middle; 0 = minimum).
Step Shape Buttons: The buttons below each step control the step shape. Clicking the button will cycle through the available step types; alternatively, right clicking on a button opens a popup in which you can enter the number that corresponds with the desired step type:
0 – STEP: Outputs a constant value for the duration of the step.
1 – RAMP: The step’s value will change from its initial value to its ending value over the duration of the step. The ending value is determined by the subsequent step.
2 – UP: The step’s value will change from an initial value that you set to the maximum value over the duration of the step.
3 – DOWN: The step’s value will change from the minimum value to an ending value that you set, over the duration of the step.
4 – SMOOTH RAMP: Similar to RAMP, but with smoothing of the value transitions between steps.
Length: Specifies the number of steps within the sequence.
Randomness: Introduces a random element to the value of the current step. The higher the Randomness setting, the larger the possible deviation from the step’s programmed value.
Destination (x2): Specifies a target parameter that will be modulated by the Motion Sequencer.
Amount (x2): Scales the strength of the Motion Sequencer’s impact on the corresponding destination parameter. Negative values will reverse the polarity of the modulation.
BUY NOW

Also available for iOS
![]()
TUTORIALS & REVIEWS:


