BLEASS Arpeggiator takes the inspirationally melodic power of a classic synth arpeggiator and supercharges it with modern features demanded by today’s musicians. Developed in collaboration with top French producer Canblaster, BLEASS Arpeggiator’s capabilities extend far beyond the clichéd up-and-down monophonic patterns of an old-school synth arpeggiator, with polyrhythms, polyphony, and a large collection of highly configurable arpeggio patterns built in.
The focus of BLEASS Arpeggiator is creativity and experimentation. The plugin’s hands-on user interface is as intuitive and spontaneous to use as a classic subtractive synth, so varying and adapting arpeggios on-the-fly is an easy, fun and organic experience.
The plugin recognises incoming performance controllers, and includes a pair of XY pads (huge fun on iPad!), a pair of advanced LFOs and BLEASS’ signature Motion Sequencer. These can modulate the arpeggiator’s parameters, unlocking a deep level of creativity that’s simply not available from modern step-sequencer-style arpeggiators.
BLEASS Arpeggiator also offers a built-in sound generator. This is a cut-down yet great-sounding FM synth that’s perfect for creating the kinds of bright, sweet and punchy sounds that can work so well with an arpeggio line. You can of course use BLEASS Arpeggiator with any other synth too (see tutorials here), with each instance of the plugin creating its own MIDI source that can be bussed to any instrument within your project.
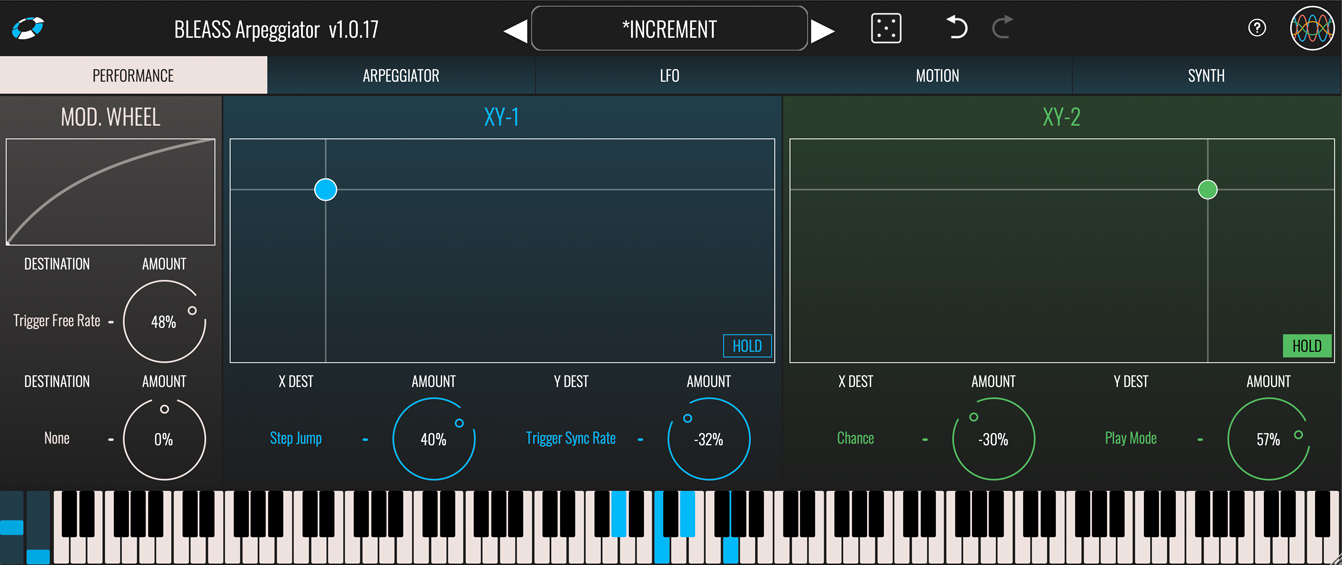
PERFORMANCE TAB
The Performance tab allows incoming realtime performance control messages to be routed to BLEASS Arpeggiator’s parameters.
MOD. WHEEL
Receives the controller messages from your keyboard’s (or other performance device’s) modulation wheel. Responds to CC1.
Response Curve: The graph indicates the current incoming mod. wheel (MIDI CC 1) value. Dragging the graph’s line changes the way BLEASS Arpeggiator responds to the incoming value.
Destination: Assign up to two parameters that will be modulated by incoming mod. wheel messages.
Amount: Controls how strongly the destination parameter will be affected by the mod. wheel messages. Positive settings will cause the destination parameter to be increased in response to an increasing mod. wheel value; negative settings will cause the destination parameter to be decreased in response to an increasing mod. wheel value.
XY-1, XY-2
BLEASS Arpeggiator includes a pair of XY Controllers for creating exciting interconnected parameter modulations. The XY Controller panels generate two modulation values simultaneously – and X and a Y value. Drag the control point to vary these values.
Hold: When disabled, the XY control point will snap back to the XY Controller’s centre when released. When enabled, the XY control point will remain in its current position when released.
X Dest: Choose the parameter that will be modulated when the control point is moved in the X (horizontal) direction.
X Amount: Controls how strongly the destination parameter will be affected by changes to the X (horizontal) position of the control point. Positive settings will cause the destination parameter to be increased in response to an increasing X position; negative settings will cause the destination parameter to be decreased in response to an increasing X position.
Y Dest: Choose the parameter that will be modulated when the control point is moved in the Y (vertical) direction.
Y Amount: Controls how strongly the destination parameter will be affected by changes to the Y (vertical) position of the control point. Positive settings will cause the destination parameter to be increased in response to an increasing Y position; negative settings will cause the destination parameter to be decreased in response to an increasing Y position.
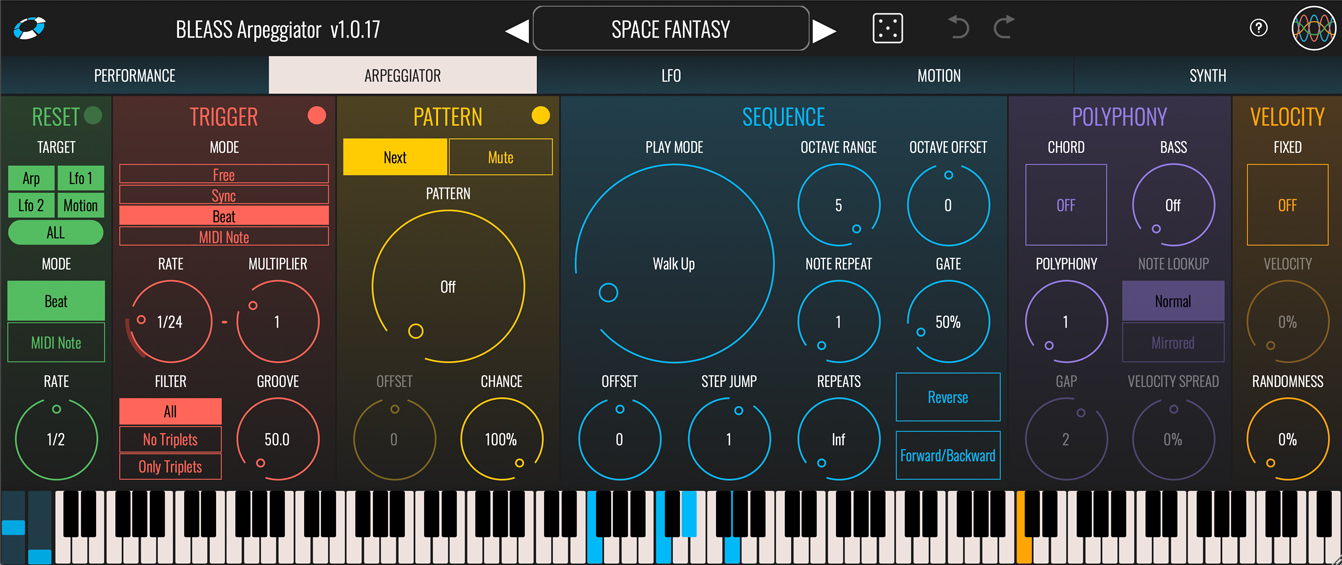
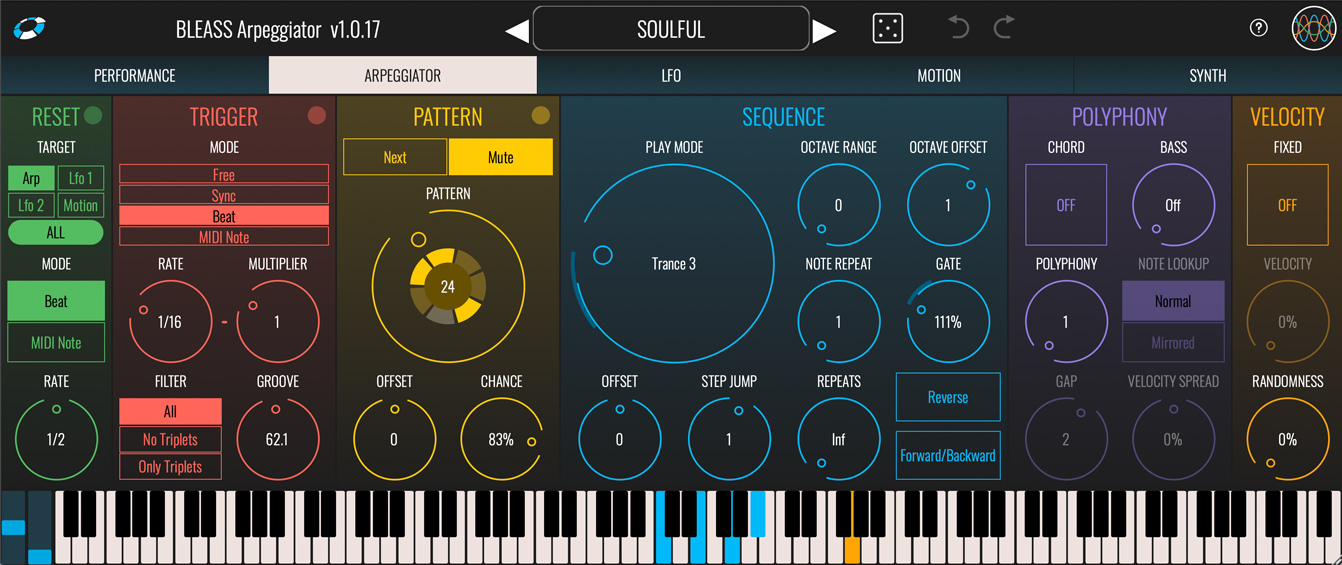
ARPEGGIATOR TAB
The settings within the Arpeggiator Tab control the rhythmic and pitch patterns produced by BLEASS Arpeggiator.
RESET
The Reset section allows the Arpeggiator, LFOs and Motion Sequencer to be reset in response to the DAW’s beat or a specific incoming MIDI note.
Target: Choose the elements of BLEASS Arpeggiator that should be restarted when a reset event occurs.
Mode: Choose whether to trigger reset events based on the DAW’s beat or an incoming MIDI note.
– When in Beat mode, use the Rate dial to set how frequently a reset event will be generated.
– When in MIDI Note mode, use the Note selector to specify which incoming MIDI note will trigger a reset event.
TRIGGER
The Trigger section controls the basic rate at which BLEASS Arpeggiator steps through the pattern of notes it creates.
Mode: Determines the synchronisation source for the step rate…:
- FREE uses an internal timer based on milliseconds
- SYNC uses an internal timer based on DAW’s beat
- BEAT synchronises steps with the host DAW’s beat and synchronises the arpeggiator pattern position to the host’s bar-and-beat position.
- MIDI NOTE advances to the next step in response to an incoming MIDI note.
Rate: Determines the base rate at which steps are triggered.
- In Free mode this is set in milliseconds.
- In Sync and Beat modes this is set in note lengths (1/4 for a crotchet, 1/8 for a quaver, 1/16 for a semiquaver, etc.).
- The setting has no effect when in MIDI Note trigger mode.
Multiplier: The value you set here is multiplied by the Rate setting to determine the actual rate at steps are triggered. A value greater than 1 will reduce the trigger rate; a value less than 1 will increase the trigger rate. This setting has no effect when in MIDI Note mode.
Groove: Constantly varies the trigger rate to create a classic swing feel. A setting of 50 results in no swing; a setting of 75 gives the maximum amount of swing. This setting has no effect when in MIDI Note trigger mode
Filter: Allows step triggers to be filtered based on their timing. This setting has no effect when in MIDI Note trigger mode.
- ALL allows all step triggers to pass unaffected
- NO TRIPLETS prevents any triplet-timed steps from passing
- ONLY TRIPLETS allows only triplet-timed steps to pass
Note: Specify the incoming MIDI note that will cause BLEASS Arpeggiator to generate a step trigger. This setting only has an effect when in MIDI Note trigger mode.
PATTERN
Pattern Selector: Turn the dial to choose from 62 different rhythmic patterns, or set to the left-most OFF position if you do not want to apply a trigger pattern.
The chosen pattern is represented by the segmented readout at the centre of the dial. Each segment represents a step in the pattern, and each is highlighted in turn in response to step trigger events. If the currently active step is enabled, as indicated by a filled segment, a note will be generated when the step is triggered, otherwise no note will be played in response to a step trigger.
Next / Mute: These buttons determine what happens when the currently active step is disabled.
When Next is active, the note that is due to sound is held back until the next active step. This means you will not lose any notes from your arpeggio, but the timing of those notes will be affected.
When Mute is active, the next note due to sound is skipped altogether and the arpeggio’s note pattern advances to its next step. This results in a constantly varying pattern of notes being produced.
Offset: When you play notes into BLEASS Arpeggiator each of those notes is assigned a position in the sequence of notes that will be generated. Typically, the first step in a trigger pattern will generate the first note in the sequencer, the second step will trigger the second note, and so-on. The Offset dial changes this relationship, shifting the note sequence with respect to the trigger pattern.
For example, with an Offset value of 1 the note sequence will run one step ahead of the trigger pattern, whilst a value of -1 would cause the note sequence to run one step behind the trigger pattern.
Chance: Specifies the chance, as a percentage, that an active step trigger will actually result in a note being generated. This percentage chance applies no matter the position of the Pattern Selector or state of the Next / Mute buttons.
SEQUENCE
BLEASS Arpeggiator creates a sequence of notes based on the chord or notes you play into it. The settings in this section allow you to determine details of the generated sequence.
Play Mode: Turn the dial to choose from 20 base sequence patterns. Some are quite basic, others quite complex.
Offset: Shifts the start position of the base sequence. For example, a setting of 1 will cause the second note of the sequence to be considered the start position.
Step Jump: Sets the number of steps by which the sequence advances after a note has been triggered.
Octave Range: Sets the number of octaves over which the note sequence will be repeated. When set to “0”, only the held notes will be played. When set to “1”, notes that are one octave higher than the held notes are added to the arpeggio; higher settings add additional octaves.
Octave Offset: Applies a positive or negative octave shift to the note sequence.
Note Repeat: Repeats each note in the sequence a number of times before advancing to the next note.
Gate: Determines the length of the notes generated by BLEASS Arpeggiator, as a percentage of the current Trigger Rate setting.
When the Trigger Mode is set to MIDI Note, the Gate setting is ignored, and the generated note plays for as long as the step trigger note is held down.
Repeats: Specifies the number of times a note sequence will be repeated.
Reverse: When enabled, reverses the play direction of the note sequence. Use to create downward arpeggios.
Forward/Backward: When enabled, causes the play direction to alternate between forward and backward directions. Use to create up/down arpeggios.
POLYPHONY
Unlike classic arpeggiators that can only play one note at a time, BLEASS Arpeggiator can create multi-line and polyphonic arpeggios. The controls in this section let you set this up.
Chord: When enabled, step triggers cause all notes of the sequence to play simultaneously.
Bass: Adds an additional bass note to the sequence. The note is based on the lowest note in the sequence, pitched down by the number of octaves selected here.
Polyphony: Determines how many of the sequence’s notes will sound in response to each step trigger. This setting has no effect when Chord mode is enabled.
Note Lookup: Determines what happens when Polyphony is greater than 1 and the sequence position overshoots the number of notes within the sequence. This setting has no effect when Chord mode is enabled or when Polyphony is set to 1.
– NORMAL: The sequence position returns to the beginning plus any remaining overshoot.
– MIRRORED: The sequence position bounces back from the end position by the remaining overshoot amount.
Gap: Specifies the number of sequence steps separating notes when Polyphony is greater than 1. This setting has no effect when Chord mode is enabled or when Polyphony is set to 1.
Velocity Spread: Determines the note-on velocity separation between notes that sound simultaneously. This setting has no effect when Chord mode is enabled or when Polyphony is set to 1.
VELOCITY
The settings in this section control the note-on velocity of the notes being generated by BLEASS Arpeggiator.
Fixed: When enabled, defines a fixed velocity for all generated notes. When disabled, note velocity is derived from the velocities of the notes that are being held down.
Velocity: Determines the velocity value of generated notes when Fixed is enabled.
Randomness: Introduces a randomising element to the velocity of generated notes. Randomness is applied after any fixed velocity setting, and so still has an impact when Fixed is enabled.
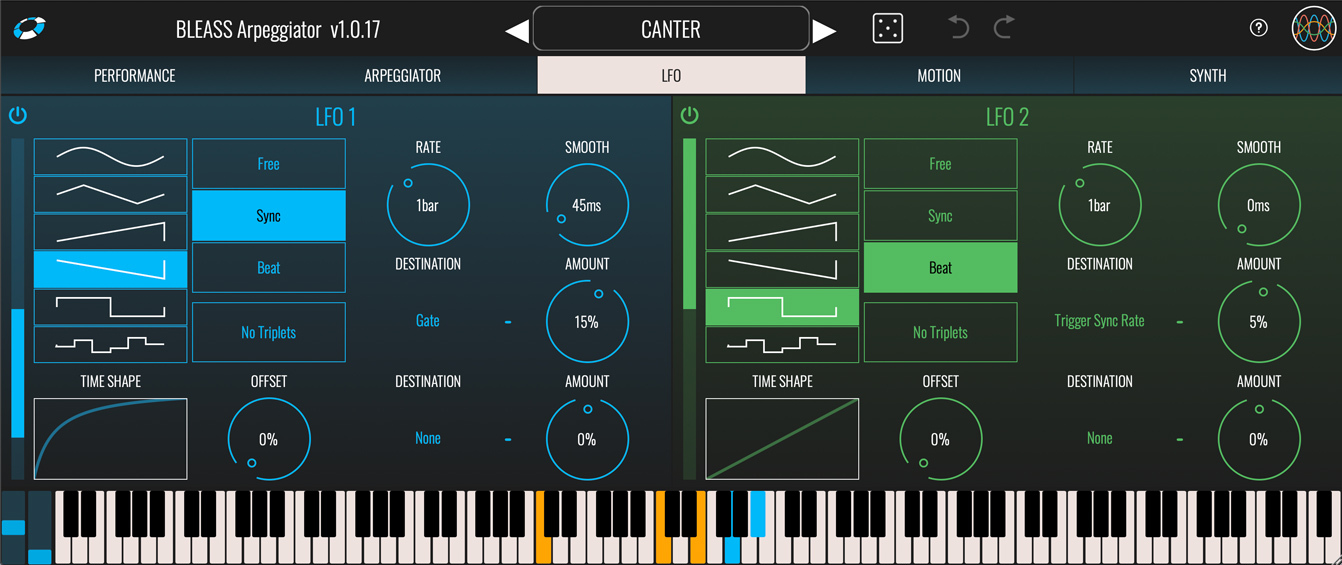
LFO TAB
BLEASS Arpeggiator includes a pair of LFOs (Low Frequency Oscillators) that can be used to modulate the plugin’s parameters. This is a great way to create dynamic, evolving arpeggios.
LFO 1 / LFO 2
On/Off Button: Enables or disables the LFO.
Shape: Sets the shape of the LFO waveform. Choose from sine, triangle, sawtooth up, sawtooth down, square and sample-and-hold
Time Shape: The Time Shape graph alters the rate at which the LFO moves through its waveform cycle. When the graph shows a straight line no time shaping will be applied. Dragging the line introduces a curve that illustrates how the LFO’s timing will change through each cycle of the waveform. Double click the graph to reset the time shape. The results of the Time Shape are clearly visible in the LFO’s visualisation.
Sync Mode: Choose the LFO’s synchronisation mode.
- FREE uses internal timing for the LFO.
- SYNC synchronises the LFO to the host DAW’s tempo.
- BEAT synchronises the LFO to the host DAW’s tempo and bar position.
No Triplets: When enabled, any triplet value selected for the LFO Rate (1/3, 1/6 etc.) will be ignored. Not available in FREE sync mode.
Offset: Offsets the start point of the LFO’s cycle, in effect shifting the LFO’s phase with respect to the DAW’s tempo or internal clock.
Rate: Sets the time taken for the LFO to complete one cycle of its waveform. The Rate is expressed as milliseconds and seconds when in FREE sync mode, otherwise it is expressed in terms of note length.
Smooth: The Smooth parameter imposes a maximum rate of change on the LFO’s output values. This means that, for example, when a saw tooth LFO wave reaches the end of a cycle the LFO value ramps down to the minimum rather than immediately dropping to the minimum, thereby smoothing-out the sudden value change. This can also have the effect of damping the magnitude of the LFO. The results of smoothing are clearly visible in the LFO’s visualisation.
Destination (x2): Specifies a target parameter that will be modulated by the LFO.
Amount (x2): Scales the strength of the LFO’s impact on the assigned destination parameter. Negative values will reverse the polarity of the modulation – in other words, when the LFO is rising the destination parameter’s value will be reduced.
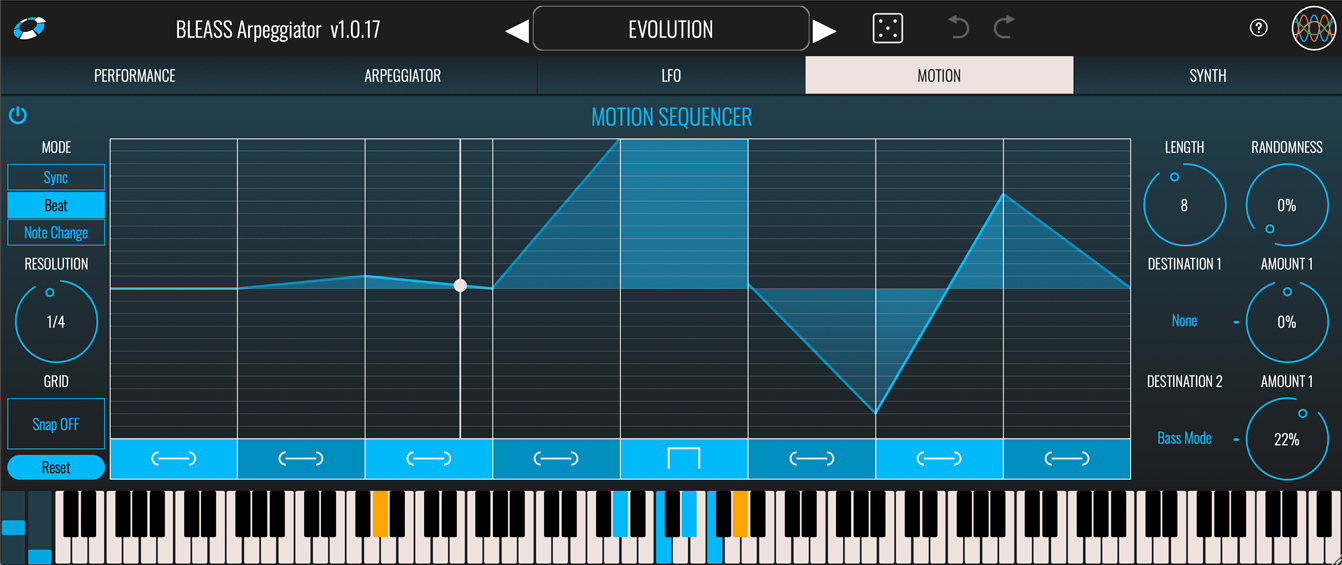
MOTION TAB
BLEASS Arpeggiator’s built in Motion Sequencer allows patterns of values to be sequenced and then used to modulate up to two of the plugin’s parameters.
ENVELOPE FOLLOWER
On/Off Button: Enables or disables the sequencer.
Mode: Choose the Motion Sequencer’s synchronisation mode.
- SYNC synchronises the Motion Sequencer to the host DAW’s tempo. The DAW does not need to be playing.
- BEAT synchronises the Motion Sequencer to the host DAW’s tempo and bar position.
- NOTE CHANGE synchronises the causes the Motion Sequencer to the host DAW’s tempo, and jumps to the next step in response to a note being played.
Resolution: Sets the length of each sequencer step with respect to the host DAW’s tempo.
Grid: When Snap ON is active, values you set in the Motion Sequencer will snap to the vertical grid. When Snap OFF is selected, any value can be set within the sequence.
Reset: Resets the sequencer’s steps to their default state
Sequencer Grid: Click on the sequencer grid to set a value for the corresponding sequencer step. You can also right-click on the grid to open a popup where you can type in a value for the step (1 = maximum; 0.5 = middle; 0 = minimum).
Step Shape Buttons: The buttons below each step control the step shape. Clicking the button will cycle through the available step shapes; alternatively, right clicking on a button opens a popup in which you can enter the number that corresponds with the desired step shape:
0 – STEP: Outputs a constant value for the duration of the step.
1 – RAMP: The step’s value will change from its initial value to its ending value over the duration of the step. The ending value is determined by the subsequent step.
2 – UP: The step’s value will change from an initial value that you set to the maximum value over the duration of the step.
3 – DOWN: The step’s value will change from the minimum value to an ending value that you set, over the duration of the step.
4 – SMOOTH RAMP: Similar to RAMP, but with smoothing of the value transitions between steps.
Length: Specifies the number of steps within the sequence.
Randomness: Introduces a random element to the value of the current step. The higher the Randomness setting, the larger the possible deviation from the step’s programmed value.
Destination (x2): Specifies a target parameter that will be modulated by the Motion Sequencer.
Amount (x2): Scales the strength of the Motion Sequencer’s impact on the corresponding destination parameter. Negative values will reverse the polarity of the modulation.
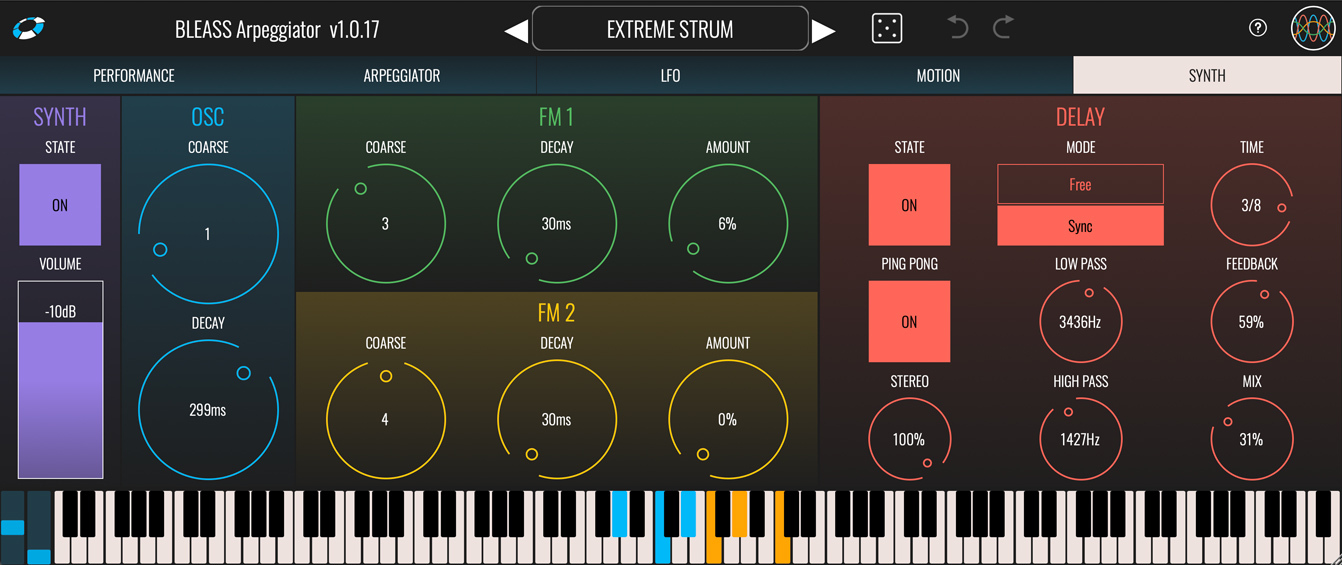
SYNTH TAB
BLEASS Arpeggiator features a built-in stripped-down FM synthesiser whose sound is a perfect match for many arpeggiated parts. You can use this on its own, use it to reinforce the sound of another synth, or disable it altogether.
The synth’s oscillator section generates a sine wave whose frequency can be modulated by the FM 1 and FM 2 oscillators. In the language of FM, the main oscillator can be thought of as the carrier, whilst FM 1 and FM 2 are modulators attached to that carrier.
SYNTH
State: Enables or disables the built-in synth.
Volume: Sets the output volume level for the built-in synth.
OSC
Coarse: Applies a tuning multiplier to the main oscillator.
Decay: Sets the decay time of the main oscillator.
FM 1 / FM 2
Coarse: Applies a tuning multiplier to the modulator.
Decay: Sets the decay time of the modulator.
Amount: Determines the strength of modulation that is applied by the modulator to the main oscillator.
DELAY
State: Enables or disables the synth’s delay effect.
Mode: Sets the delay’s synchronisation mode. In Free mode, delay time is set in milliseconds and seconds. In Sync mode the delay time is based on the host DAW’s tempo, with delay time set in terms of note length.
Time: Sets the delay time either in absolute milliseconds and seconds, or in note lengths relative to the host DAW’s tempo.
Ping Pong: Enables or disables the delay’s ping-pong mode. When enabled, delay repeats alternate between the processor’s left and right channels. Note that the stereo width of the ping-pong effect is determined by the Delay’s Stereo setting.
Stereo: Works in conjunction with the Ping Pong mode to set the stereo width of the alternating repeats. At ±100%, repeats are panned hard left and right; at 0%, repeats are all panned centrally. Only available when Ping-Pong mode is active.
High Pass: Applies a high-pass filter to the delay repeats at the selected cutoff frequency.
Mix: Sets the wet/dry balance of the delay processor. At 0% only the dry synth signal is heard; at 100% only the delayed signal is heard.
TUTORIALS & REVIEWS: